
I am a little bit late in the game, but finally found some time to create my first code app. In this post I will create a simple page with a calendar which shows events from a custom events table. I created a similar generative page previously and now will do the same as a code app.
Following the instructions from the Microsoft Learn is the best way to start, but I will guide you through a similar process putting it all in once place. The link to the Microsoft Quickstart to create a code app from scratch is displayed at the bottom of the post. There are certain prerequisites that are required in order to start and build Power Apps code apps:
- Power Platform environment with code apps setting enabled
- Node.js LTS version installed
- VS Code with the Power Platform CLI extension enabled
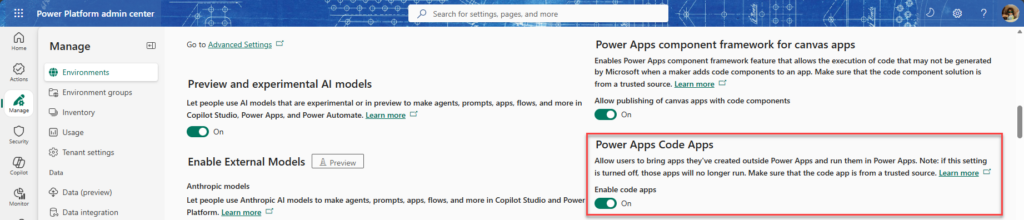
To start, we will first enable the Code Apps setting in your environment. To do that, go to your environment in the Power Platform Admin Center and click on Settings and then Features. Scroll down till you get to the Power Apps Code Apps section, and change the toggle of Enable code apps so that it is enabled, and then save your changes.
Next, assuming that you installed Node.js and the Power Platform CLI, Open Visual Studio, code and open a new terminal. From the terminal navigate to a folder (parent folder) where you want to create your new code app (for example C:\Repos\CodeApps).
First we need to download and install the template from the Microsoft github repo. We do this by calling the following (replace myApp with the name that you want to give your app and this will also be the folder that is created).
npx degit github:microsoft/PowerAppsCodeApps/templates/vite myAppWhen running the npx degit command, you will likely get a message in your Terminal window that you need to install the degit package (at the time of writing it will be degit@2.8.4). Enter y after the Ok to proceed. Once completed, change the directory to the directory that you created for your new code app.
cd myAppNext, we need to authenticate against our Power Platform tenant and select the environment that we are going to use. Start by authenticating against your tenant:
pac auth createThis command will pop up a Microsoft login control where you will enter your Entra Id and password or other means via Authenticator app. If there is a newer version of the PAC CLI, you will receive a message that a newer version of Microsoft.PowerApps.CLI has been found and to run the following command:
pac install latestYou might have to re-authenticate of you run the pac install latest here. Once you are authenticated against the tenant, you will want to select the environment that you will be using. You will need to get the environment id (Unique Identifier) in order to run the next command. You can get the environment id from the Power Platform admin center or from the Power Apps Maker portal (as part of the url). Run the following command to select the environment (replace the empty Guid below with the actual environment id):
pac env select --environment 00000000-0000-0000-0000-000000000000The next step will be to add all the required packages from npm by running the install command
npm installOnce all the packages are added, we will need to initialize the code app by running the code init command. You will want to provide the display name that you want to use for your app here:
pac code init --displayname "My First Code App"At this point in time, you can test your app with the default page by running the following command:
npm run devThis will run the Power Apps Vite Plugin, and will provide with a local url link (running in your own localhost) and a local play link, which will run inside of the maker portal containing the localAppUrl and the localConnectionUrl as part of your query parameters. The following are examples of both (this urls are fake so will not work)
http://localhost:5193/
https://apps.powerapps.com/play/e/00000000-0000-0000-0000-000000000000/a/local?_localAppUrl=http://localhost:5193/&_localConnectionUrl=http://localhost:5193/vite_powerapps_plugin/power.config.json
Clicking on the links will open the app in both localhost or Power Apps.
The next thing to do, is to add a data source to Microsoft Dataverse so that I can consume data from a table. In our case, I am using the table called event. This is done by executing the add data source command from PAC CLI. The a stands for api and the t for table in the command below:
pac code add-data-source -a "dataverse" -t hl_eventOnce the data source has been created, we can start building components that will use this table. When the data source is added, there will be 2 files added to the code app project. There will be a ts file called hl_eventsService.ts in the generated/services folder and an hl_eventsModel.ts in the generated/models folder which will both be used in our next steps.
You can start coding your new page or if you have Github Copilot Chat, you can run a few prompts that will design a page for you. In my particular case, I used a prompt to generate a calendar page. We can modify the prompt to be more extensive, but this was the first run.
Create a new typescript component in the src folder that will display all of the events from the hl_event table in calendar format by Month. The file should import the EventsService and Events Type to the new page as their data source:

import { EventsService } from './generated/services/hl_eventsService';
import type { Events } from './generated/models/hl_eventsModel';

You will need to use the following logic to retrieve the data:
const result = await EventsService.getAll();
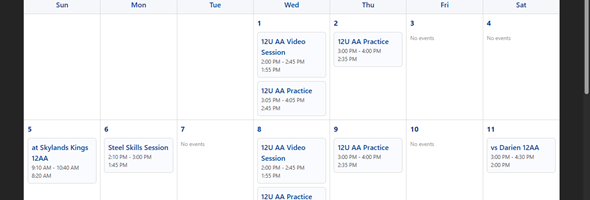
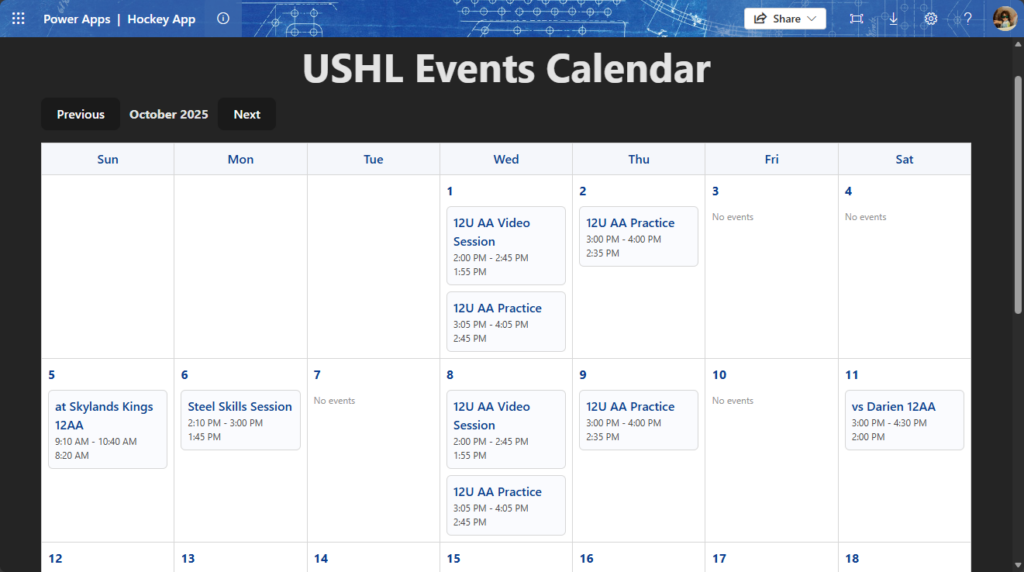
The result from this was a calendar tsx page displaying the events by month, however it only display the Start Time of each event. I added an additional prompt to tell it how to format the data in each day of the calendar using the following prompt:
For each event that is displayed in the calendar, show it inside a box showing the following fields: Name (ushl_Name), Start Time (ushl_StartTime), End Time (ushl_EndTime), Arrival Time (ushl_ArrivalTime).
The fields should be displayed as follows:
Name
Start Time - End Time
Arrival Time
The result from both prompts dislayed the vents calendar as shown below:
Once the app is working as expected, we can run the following commands in the Terminal window to complete the build and deploy the code app:
npm run build

pac code push
Resources:
Quickstart: Create a code app from scratch – Power Apps | Microsoft Learn
How to: Connect your code app to Dataverse – Power Apps | Microsoft Learn