

Side Panes in Model Driven Apps have been around for some time now, and we have used them for showing Entity Lists, Entity Records and web resources. In addition to the standard types that we can display in the side panes we can also display custom pages and PCF controls.
In the last year or so, many of us have gotten ourselves into vibe coding, and with the ability to use many tools available out there, we can design custom React and Fluent UI apps by using Natural Language. For people who have used PCF controls in the past it is fairly simple to convert these React Apps into PCF controls (Standard or Virtual), and with AI assistants within VSCode or other models you can create a PCF control in much less time than what it used to take.
In the case below, the chat that you see was developed using Generative Pages in Power Apps and the code from the Page was used to create this PCF control with the help of Github Copilot and Visual Studio Code.
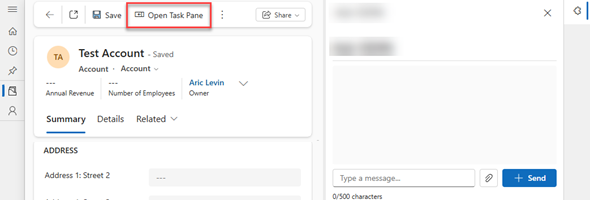
The end result that we want to achieve is having the PCF control in the side pane as shown below:

Once we have developed and uploaded the PCF control to our solution, there are two steps that we need to take in order to get this working. Since side Panes are opened using code and not dynamically because they have to be created, we will trigger the creation of the side Pane using a button in the Command Bar, so that when the user clicks the button it will create and display the side Pane.
You can use modern commanding and create a button in a form or view and run a JavaScript (see end of post) to open the side Pane.
You can see the modern command interface below and how to set it up.

You can also use Ribbon Workbench to create a button in form or view, but Ribbon Workbench also allows you to modify the Global Ribbon, which allows you to create a button that will always be present in whichever place you are in your model driven app. See example below:
When the user clicks either of these two buttons, we can call the JS code shown below to open the task pane, showing a PCF control inside of the pane:
(async () => {
  const pane = await Xrm.App.sidePanes.createPane({
    title: "PCF Chat",
    paneId: "pcfPane",
    width: 420,
    canClose: true,
    alwaysRender: true // keeps state when switching tabs
  });

  try {
    await pane.navigate({
      pageType: "control",
      controlName: "pcf.PCFControls.ChatControl",
    });

    setTimeout(() => {
      if (Xrm.App.sidePanes.getSelectedPane()?.paneId === "pcfPane") {
      }
    }, 700);
  } catch (e) {
    console.log("SidePane Error: ", e.error)
  }
})();
Notice that the pageType in the pane.navigate is set to “control”, which means that this is a PCF control. If you were using a Custom Page, you would set it to custom and pass alternate parameters for the custom page with a page Type of “custom”.