

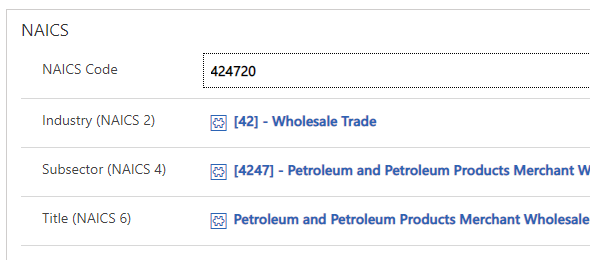
In many of the projects that I have worked over the past years, either government of private sector, while working with other businesses it has become a common practice to request that Industry information from the companies that you work with, and furthermore the NAICS code. While not every company knows their NAICS code, drilling down to get it using the Industry (2-digit code), Subsector (4-digit code) and NAICS title (6-digit code) might be the way to go, sometimes you might want to bypass this complex search if you know ahead of time your business’ NAICS code and have it auto populated for you.
In this article I will demonstrate the prep work that I did in order to have the NAICS codes stored within the Model-Driven app, and how to create the PowerApps Component Framework custom control that will retrieve the NAICS code.
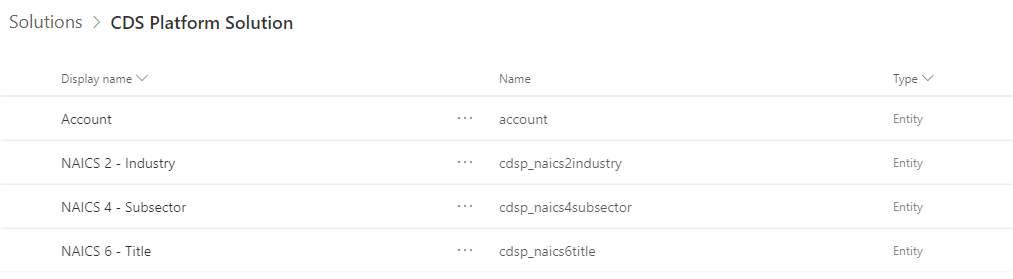
The first thing that I needed to do was create the entities that will store the NAICS information. I created three separate entities for Industry, subsector and NAICS codes/titles. The image below shows that entities that are used as part of this solution. The account entity is used to display the custom control.
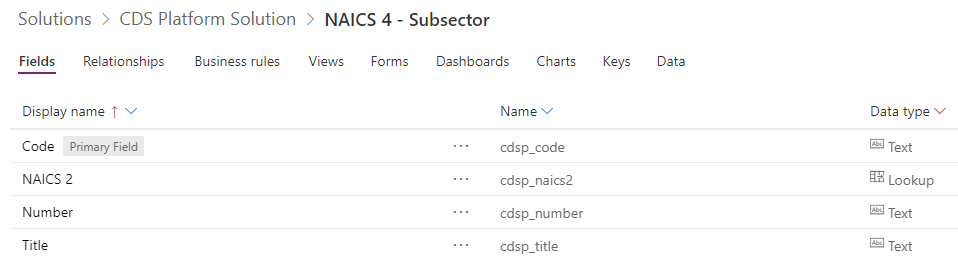
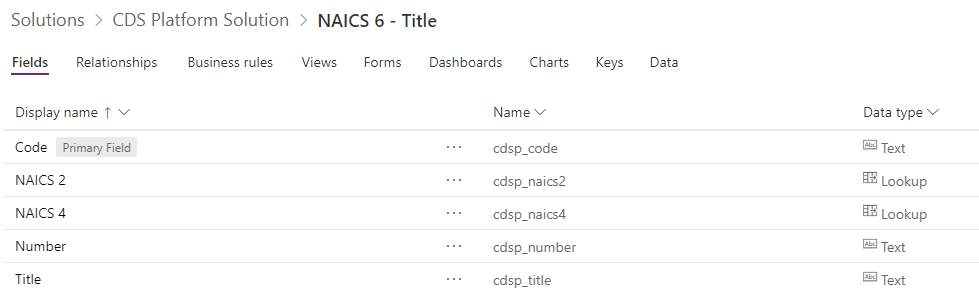
Next, I will show the data that makes up these three entities. You will see the 4-digit and 6-digit NAICS codes have lookups to the parent entities to simplify the entry and search process.
Industries [2-digit NAICS]

Subsectors [4-digit NAICS]
NAICS Titles [6-digit NAICS]
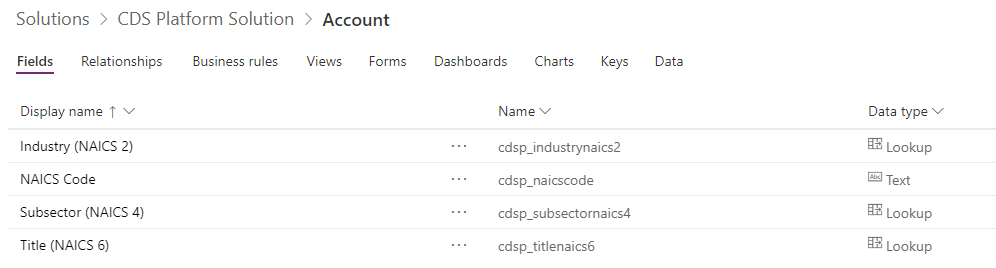
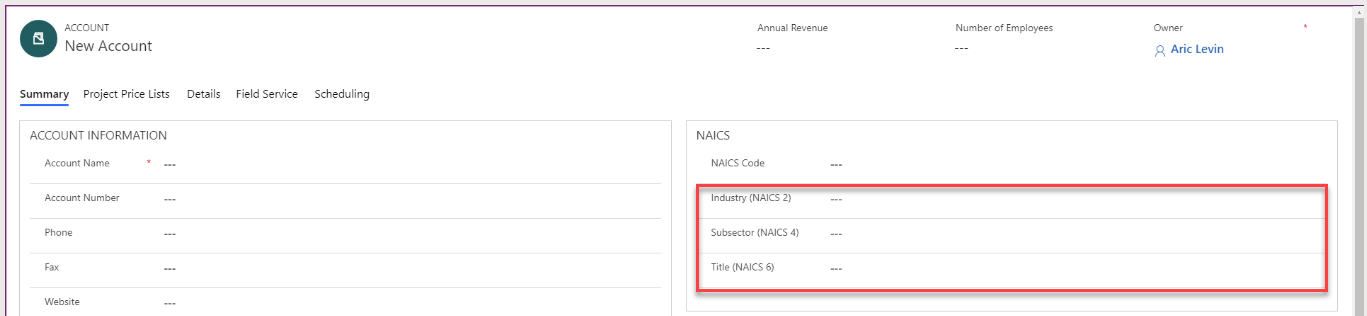
Once we have created the entities and the fields in the 3 lookup entities, we will create the fields in the account entity where they can be viewed from. The two images below will show the fields and the form design.
Account Entity NAICS related fields:
Account Entity form design:
Now that we have done all the prep work, we are ready to start creating our new PowerApps Component Framework custom control. In this post, I will go through a step by step explanation create the PCF control and deploy it to your Model-Driven app/CDS environment.
I will be using Visual Studio Code for the development of the PCF control, and Developer PowerShell for Visual Studio 2019. You can use the Command Prompt for Visual Studio 2017/2019 as well.
The first thing that we need to do is download and install Node.js and the PowerApps Command Line Interface. For Step by step instructions, please view the PCF Control Guide.
To start we will create a folder on our workstation where we want to store the PowerApps Component Framework custom control project. In our case we used the D:PowerPlatformPCFNAICSGenerator folder. Once this folder has been created, we open Visual Studio Code, and from the Start page, we select Open Folder and point it to the folder that we created for this solution.
Next, we select Terminal from the View menu in order to allow us to run PowerShell commands to add the required components, test and build the solution. The first command that we will need to run is the pac pcf init command, which will create the manifest and typescript files for us.

After the project has been created, you can navigate to the project directory, and you will notice that a subfolder with the name of the component has been created. The subfolder contains the ControlManifest.Input.xml and index.ts files.
We can now go ahead and install all the required dependencies that are required. This steps can take a few minutes to complete. The command to install the dependencies is npm install. While this task is executing you will see progression on your command prompt window, and you might see a few warnings or errors.

You will notice in Visual Studio code that a node_modules folder was created with a lot of subfolders containing script files. This contains a large variety of available modules that can be added to your typescript project.
Next, we will need to update the manifest file to include the required control and properties. The below shows the final view of the manifest file.
<?xml version="1.0" encoding="utf-8" ?>
<manifest>
  <control namespace="PCFControls" constructor="PCFNaicsCodeSplitter" version="0.1.1" display-name-key="PCFNaicsCodeSplitter" description-key="PCFNaicsCodeSplitter description" control-type="standard">
    <property name="NAICSCode" display-name-key="PCFNaicsCodeSplitter_NAICSCode" description-key="NAICS Code Field" of-type="SingleLine.Text" usage="bound" required="true" />
    <property name="NAICS2Control" display-name-key="PCFNaicsCodeSplitter_NAICS2Control" description-key="NAICS2 Control Field Name" of-type="SingleLine.Text" usage="input" required="true" />
    <property name="NAICS4Control" display-name-key="PCFNaicsCodeSplitter_NAICS4Control" description-key="NAICS4 Control Field Name" of-type="SingleLine.Text" usage="input" required="true" />
    <property name="NAICS6Control" display-name-key="PCFNaicsCodeSplitter_NAICS6Control" description-key="NAICS6 Control Field Name" of-type="SingleLine.Text" usage="input" required="true" />
    <resources>
      <code path="index.ts" order="1"/>
      <css path="pcfcontrols.css" order="1" />
    </resources>
    <feature-usage>
      <uses-feature name="WebAPI" required="true" />
      <uses-feature name="Utility" required="true" />
    </feature-usage>
  </control>
</manifest>
You will notice in the above file that the control has 4 properties. The first property contains the bound control that contains the 6 digit NAICS code that the user will type. The next 3 properties are text fields that contain single like of text, which contain the names of the three lookup controls. Lookup controls are currently not available for use as bound controls within PCF solutions.
You will also see that we include the WebApi and the Utility features. These features allow us to call the classes of the Xrm namespace which contain the methods for accessing the WebApi and Utility methods.
We not start making changes to the typescript file in order to provide the functionality that we are looking for. Note that the typescript contains several parameters that were used for testing and debugging purposes, and can be removed if so required.
We will first look at the variable declarations of the class.
    private _context: ComponentFramework.Context<IInputs>;
    private _notifyOutputChanged: () => void;
    private _container: HTMLDivElement;

    private _naicsCodeElement: HTMLInputElement;
    private _naicsCodeErrorElement: HTMLElement

    private _naicsCodeChanged: EventListenerOrEventListenerObject;
    private _naics6id: string;

    private _naics2FieldName: string | null;
    private _naics4FieldName: string | null;
    private _naics6FieldName: string | null;
The variable declarations include the default context, notifyOutputChanged and container parameters, as well as the HTML elements, event listener object and other string variables. These variables will be initialized in the init function.
public init(context: ComponentFramework.Context<IInputs>, notifyOutputChanged: () => void, state: ComponentFramework.Dictionary, container:HTMLDivElement) { // Add control initialization code this._context = context; this._notifyOutputChanged = notifyOutputChanged; this._container = container; this._naicsCodeChanged = this.naicsCodeChanged.bind(this); // textbox control this._naicsCodeElement = document.createElement("input"); this._naicsCodeElement.setAttribute("type", "text"); this._naicsCodeElement.setAttribute("placeholder", "Enter a 6 Digit NAICS Code"); this._naicsCodeElement.setAttribute("class", "pcfinputcontrol"); this._naicsCodeElement.addEventListener("change", this._naicsCodeChanged); this._naicsCodeErrorElement = document.createElement("div"); this._naicsCodeErrorElement.setAttribute("class", "pcferrorcontroldiv"); var naicsErrorChild1 = document.createElement("label"); naicsErrorChild1.setAttribute("class", "pcferrorcontrolimage") naicsErrorChild1.innerText = ""; var naicsErrorChild2 = document.createElement("label"); naicsErrorChild2.setAttribute("id", "errorelementlabelid"); naicsErrorChild2.setAttribute("class", "pcferrorcontrollabel"); naicsErrorChild2.innerText = "Invalid NAICS Code Entered"; this._naicsCodeErrorElement.appendChild(naicsErrorChild1); this._naicsCodeErrorElement.appendChild(naicsErrorChild2); this._naicsCodeErrorElement.style.display = "none"; this._container.appendChild(this._naicsCodeElement); this._container.appendChild(this._naicsCodeErrorElement); this._naics2FieldName = context.parameters.NAICS2Control.raw; this._naics4FieldName = context.parameters.NAICS4Control.raw; this._naics6FieldName = context.parameters.NAICS6Control.raw; }
The init function contains the variable initialization, creation of child elements (such as error element), and reading of the names of the fields used for the 3 lookup controls.
The naicsCodeChanged function below retrieves the data from the HTML element, and calls the RetrieveNAICSReferences function passing to it the 6 digit NAICS code. After this is complete the nofifyOutputChanged function is called.
    public naicsCodeChanged(evt: Event):void
    {
        var naicsCode = this._naicsCodeElement.value;
        console.log(naicsCode);
        this.RetrieveNAICSReferences(naicsCode);
        this._notifyOutputChanged();
    }
The RetrieveNAICSReferences function call the WebApi to retrieve the values of the NAICS 2, 4 and 6 lookups from the NAICS6 – Title entity.
    private RetrieveNAICSReferences(naicsCode : string) {
        var entityName = "cdsp_naics6title";
        var retrieveMultipleOptions = "?$select=_cdsp_naics2_value,_cdsp_naics4_value,cdsp_naics6titleid,cdsp_title&$filter=cdsp_number eq '" + naicsCode + "'";
        var thisRef = this;
        this._context.webAPI.retrieveMultipleRecords(entityName, retrieveMultipleOptions).then(function (results: any) {
            for (let entity of results.entities) {
                var naics2Value = entity["_cdsp_naics2_value"];
                var naics2Text = entity["_cdsp_naics2_value@OData.Community.Display.V1.FormattedValue"];

                var naics4Value = entity["_cdsp_naics4_value"];
                var naics4Text = entity["_cdsp_naics4_value@OData.Community.Display.V1.FormattedValue"];

                var naics6Value = entity["cdsp_naics6titleid"];
                var naics6Text = entity["cdsp_title"];

                // @ts-ignore
                Xrm.Page.getAttribute(thisRef._naics2FieldName).setValue([{ id: naics2Value, name: naics2Text, entityType: "cdsp_naics2industry" }]);

                // @ts-ignore
                Xrm.Page.getAttribute(thisRef._naics4FieldName).setValue([{ id: naics4Value, name: naics4Text, entityType: "cdsp_naics4subsector" }]);

                // @ts-ignore
                Xrm.Page.getAttribute(thisRef._naics6FieldName).setValue([{ id: naics6Value, name: naics6Text, entityType: "cdsp_naics6title" }]);
                break;
            }
        }, function (error) {
            thisRef._context.navigation.openAlertDialog(error.message);
            return [];
        });
    }
We retrieve each of the three values and call the setValue function on each of the lookup fields. The reason for using this is the bound attributes are not yet available for lookup controls.
We call the updateView to display any errors that might have occurred. In this solution we have not really captured any errors.
    public updateView(context: ComponentFramework.Context<IInputs>): void
    {
        // Add code to update control view

        // Display Error
        if (this._naicsCodeErrorElement.style.display != "none")
        {
            var message = "The NAICS COde  is not valid.";
            var type = "ERROR";  //INFO, WARNING, ERROR
            var id = "9443";  //Notification Id
            var time = 5000;  //Display time in milliseconds

            // @ts-ignore
            Xrm.Page.ui.setFormNotification(message, type, id);

            //Wait the designated time and then remove the notification
            setTimeout( function () {
            // @ts-ignore
                Xrm.Page.ui.clearFormNotification(id);
            }, time );

        }
    }
Finally in the getOutput we return the value of the 6 digit search code:
    public getOutputs(): IOutputs
    {
        return {
            NAICSCode: this._naics6id
        };
    }
The last two method which are not commonly used are the construction and destructor as shown below:
    constructor()
    {

    }

    public destroy(): void
    {
        // Add code to cleanup control if necessary
        this._naicsCodeElement.removeEventListener("change", this._naicsCodeChanged);
    }
Once all the code is done we can test the application and run it. Since this application uses WebApi, this cannot be tested properly from within the context of the PowerApps Component Framework Test environment, but we can still do this by passing some sample data.
The command to build to solution is npm run build, and in order to run it within the Test environment it is npm start.

We not open Developer PowerShell for VS2019, create a directory for the solution (can be called solution or something similar) and will run various commands within that new empty directory. You can create a powershell script file so that you don’t have to redo this, as every time that you will have to run this, it will save you some time.

Once the solution has been we are ready to deploy it. Again here, there are a couple of calls that have to made in order to have the completed deployment.
We will call the pac auth create and pac pcf push to deploy the solution to our CRM environment.
pac auth create –url https://pcfapps.crm.dynamics.com
pac pcf push –publisher-prefix PCFC
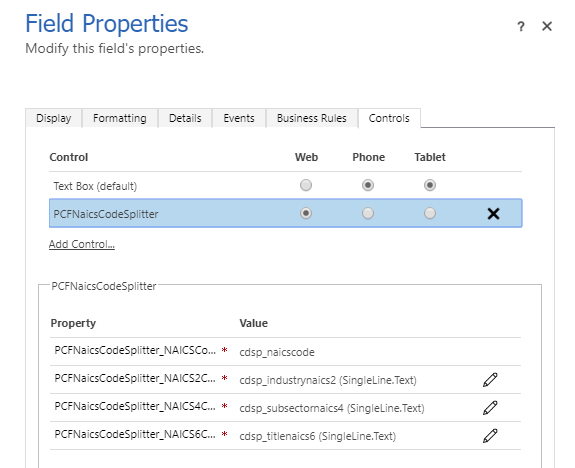
Once the solution is deployed, we will open that account form, and configure the control. Within the account form, select the control, and double click or click and choose properties. This will open the control’s property window. Within the property window we will click on the Controls tab, and choose Add Control, and then add the control that we created. The window should look similar to what is displayed below.
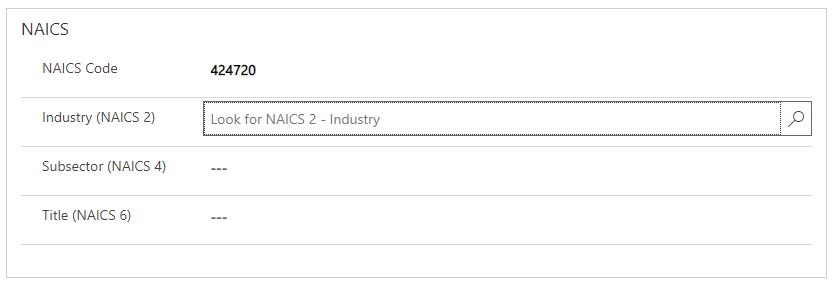
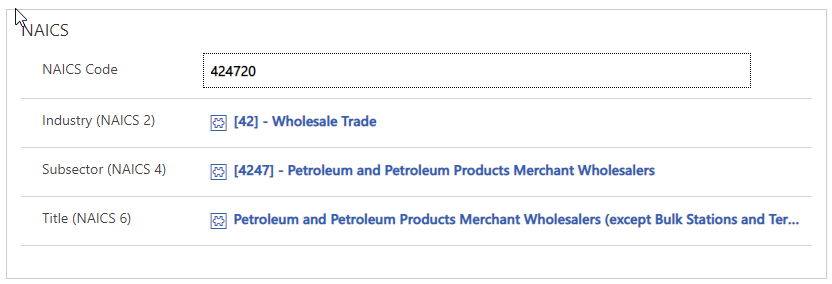
The next three images show us how the controls look on the form and the result.

You can download the lab instructions, source code and solution using the links below: