

In this blog post I will demonstrate how to use Azure Service Bus and a Listener application to integrate between the Common Data Service (Dynamics 365 or Power Apps Model Driven Application) and an On Premise SQL Service database.
There are various other ways to implement this, with the combination of Azure products such as Azure functions, Azure Logic Apps, On-Premise Data Gateway and Microsoft Flow, but those are not always available, especially when working in non-commercial environments, or when IT restricts what resources are available to the different departments of the agencies.
In order to implement this, there are a few prerequisites that have to be completed. These are set up the database server, write the console application to act as the event listener, install the Azure Service Bus, create plugin code to call the Azure Service Bus when a particular event happens. The logic of this article will be as follows: When an account record gets created or updated, it will call the Azure Service Bus in order to update an On-Premise SQL database that a new record is created or an existing record got updated.
Configuring the SQL database
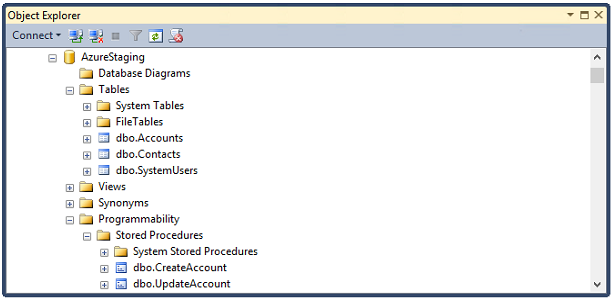
We will start with the first step which is the configuration of the database. You can set up the database with a single table (to use only for Accounts), or add some related tables if necessary. We will also create a couple of stored procedures to Insert and Update the Accounts table. Links to code files will be shared at the end of the post. The image below displays the database structure. For the purpose of this articles, the Contacts and Users tables will not be required.
Create the Azure Service Bus Namespace
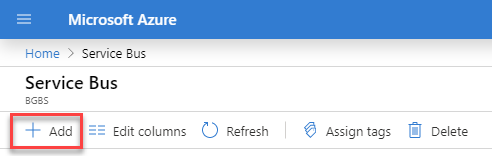
We can now create the Azure Service Bus. Login to your Azure Portal and search for Service Bus under the list of available Resources. Click on the Add button to add a new service bus.
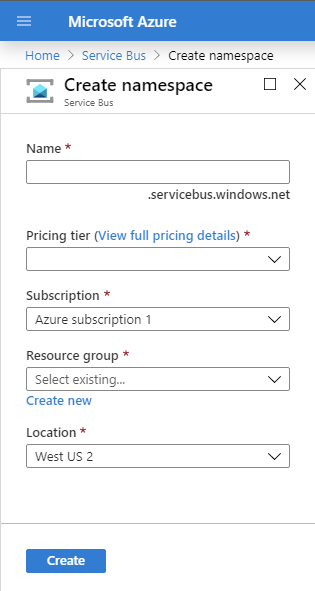
This will open the create namespace window. Enter a name for your service bus in the Create Namespace window. It will append servicebus.windows.net to the name that you specify. Select a pricing tier, your subscription, resource group and location where you want this hosted. If you do not have a resource group, you can create a new one from this window.
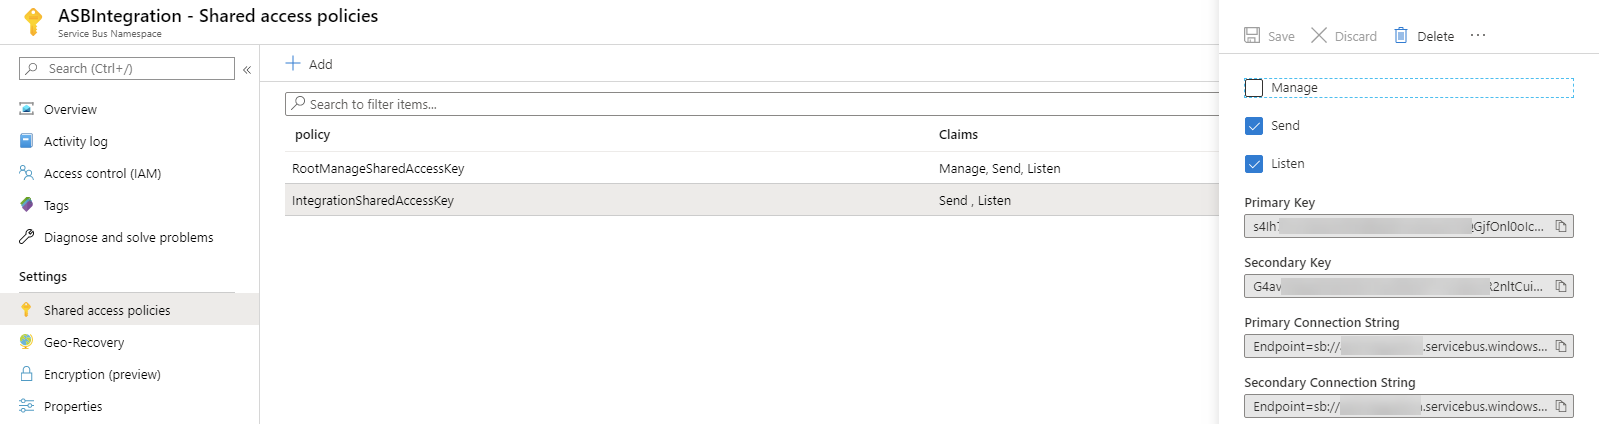
It will take a couple of minutes (or less) to create your namespace, and then the Azure Service Bus will be visible on your screen. The first thing that we need to do is check the Shared access policy. There is a default Shared Access policy that is available with the new Azure Service Bus that was created, and includes the three available claims: Manage, Send, Listen.
Send we only need Send and Listen, we will create a new Shared access policy, naming it IntegrationSharedAccessKey (or any other name that you would like) and set the available claims to Send and Listen. After you create your shared access policy, click on it to see the Keys and the Connection Strings. You will need them for configuring CDS and your Console application.
Configure the Service Endpoint in CDS
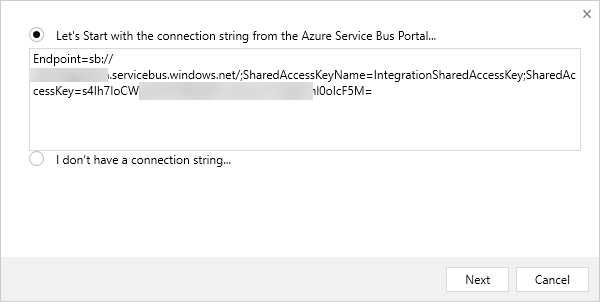
Next, let’s add this to out CDS environment, by running the Plugin Registration Tool. We will be using the Plugin Registration Tool for version 9.1. Run the Plugin Registration Tool and Create a new connection to your CDS environment. Click on Register and Select a new Service Endpoint. Copy the Connection String from your Service Bug Resource in Azure, and paste it in the popup window. Make sure that the Let’s Start with the connection string from the Azure Service Bus Portal… option is selected (as shown below).
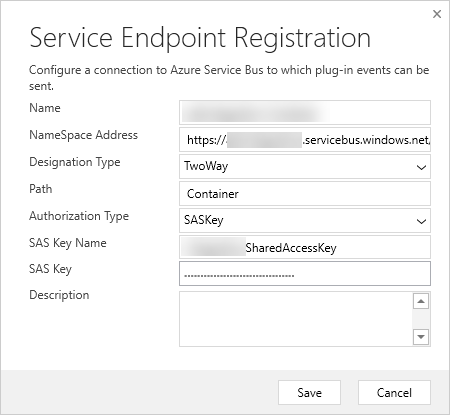
In the next window, Service Endpoint Registration make the following changes:
- In the namespace address, change sb to https
- In the Designation Type change to Two Way (you can also do One Way if you prefer, but in this particular examples we are using two-way.
- Enter a path for the Service Endpoint. This will be used by the console application to listen to where changes are being made.
- The Authorization Type should be set to SASKey, with the SASKeyName as the name of your Shared Access policy in Azure, and the SAS Key copied from the Primary Key in the Shared Access policy.
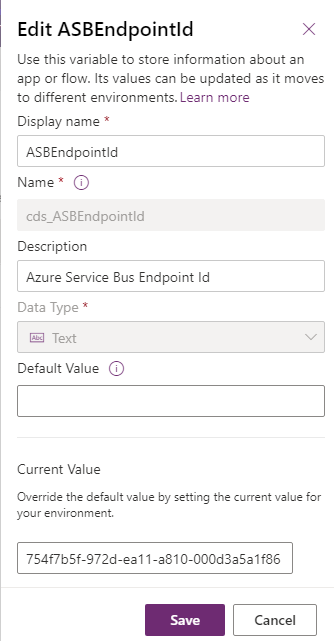
After we have created the Service Endpoint, we need to capture the Guid of the Service Endpoint as we will use it from the plugin that we will soon start developing. In order to get the Guid of the Service Endpoint, click on the Properties tab, and scroll down till you see ServiceEndpointId property. Copy the Guid from there. We can hard code this in our application, or add it as Environmental Variable inside of CDS.
Add Environmental Variable in CDS
Navigate to a solution inside of Power Apps, select the solution and click on the New button on the command bar. Your will see the option to add new environmental variable. Enter a display name, schema name (automatically populated), description and data type. As this is going to store a Guid, you should use Text as the data type. You can enter a default value for your new EndpointId or specify a new value. The screenshot below shows how this is added.
As the Environmental Variables are still a new feature and there are some issues that have to be dealt with, you can use the Portal Settings entity or another Configuration entity to store your variables.
Writing the Plugin Code
We can now start developing the plugin code. This is a simple plugin that will run on the Account Create and Account Update messages. Our Plugin includes three code files: Plugin.cs, Account.cs and AccountLogic.cs.
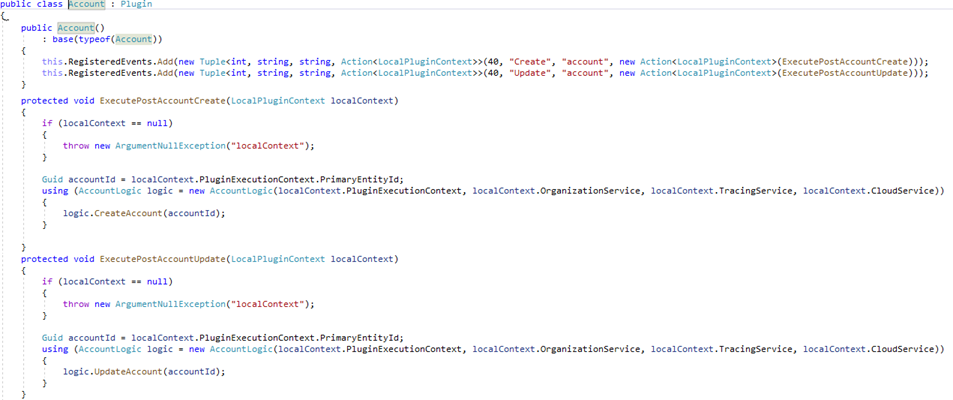
The Plugin.cs is the standard tool generated Plugin.cs file that implements the IPlugin interface. There are only a couple of changes that were done to this class, since we need to communicate with Azure Service Bus.
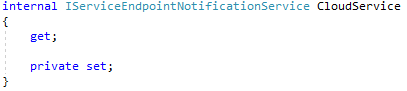
We added an internal property called CloudService of type IServiceEndpointNotificationService. In the LocalPluginContext constructor, we set the value for the CloudService property.

The Account Class adds the Create and Update events to the RegisteredEvents collection, and adds two functions: ExecutePostAccountCreate and ExecutePostAccountUpdate which get the Account Id and call the CreateAccount or UpdateAccount of the logic class.
The AccountLogic class has a construction that takes four parameters: the Plugin Execution Context, Organization Service, Tracing Service and the Service Endpoint Notification Service. These are all used for the different purposes of the plugin.
Both the CreateAccount and UpdateAccount functions have the exact same logic. The difference is in the message which is going to be passed to the Azure Service Bus as part of the context.
The CreateUpdateAccount function Retrieves all the data from the Account record, gets the Endpoint Id (from the Enviromental Variables Entities), adds the Account record to the Shared Variables of the Context and finally calls the Azure Service Bus passing the context, which includes the data from the Account entity.
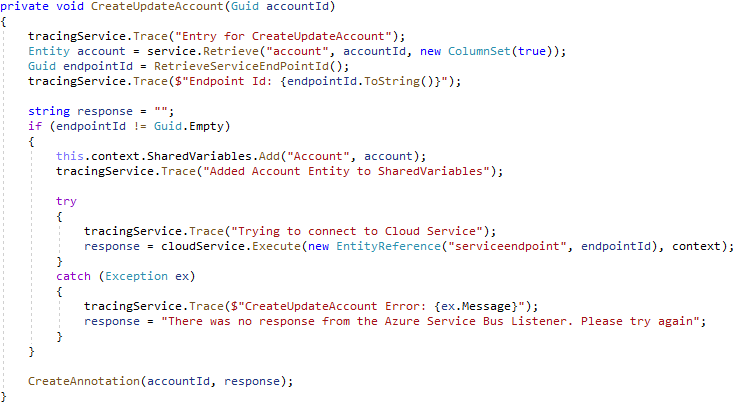
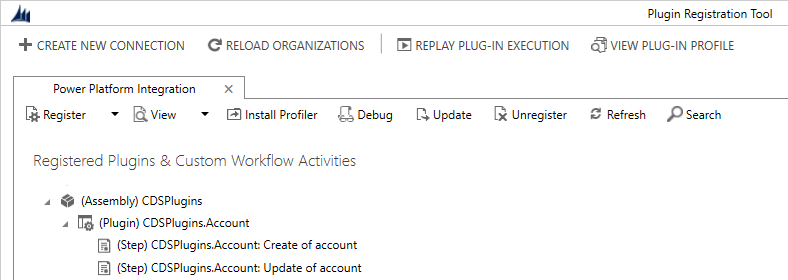
After the plugin receives the response, it writes the response to a note within the account record. After the plugin is complete, make sure to sign and compile it, and then register it with the plugin registration tool. When the assembly is registered, add two messages (one for Create and one for Update of the Account entity).
Writing the Listener Windows Service Application
The final step is to work on the Console Application. We can start by writing the helper class that will connect to SQL Server and Create a new Account record. The first thing that we need to do is add a connection string to the App.Config that is part of the Console Application. If an App.Config file does not exist, you can create one.
In the Connection String section enter the following code:
<add name=”AzureStaging” connectionString=”Data Source={LOCALDBSERVERNAME};Initial Catalog=AzureStaging;User ID=azureadmin;Password=Azur3Adm1n;Persist Security Info=False” />
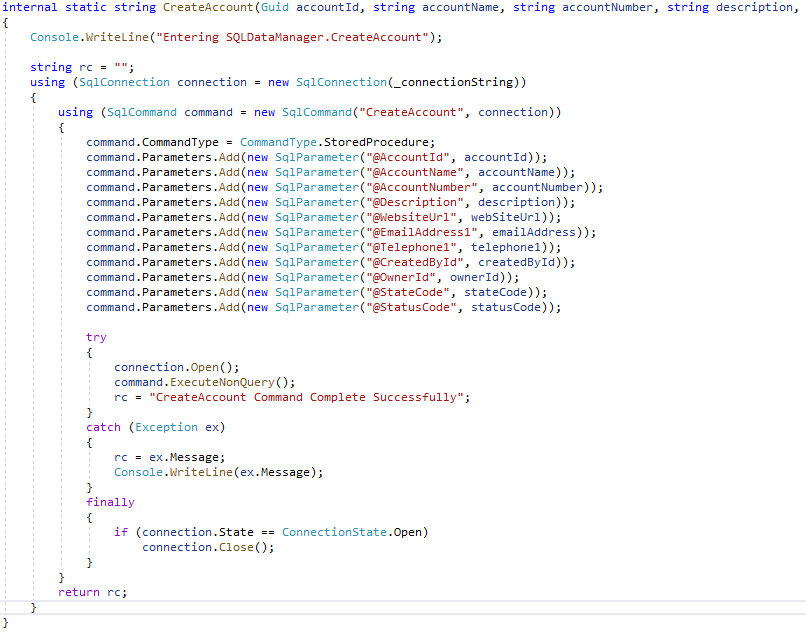
We create a SqlDataManager class which will call the SQL server stored procedures to Create and Update the account records. The functions will receive the values of the different fields in SQL Server and add them as Stored Procedure parameters as shown below:
Next we create the class to listen and process the incoming requests from Azure Service Bus. The class has a default public function called Execute which accepts a RemoteExecutionContext parameter. This parameters contains the Shared Variables that we passed from our plugin as well as the execution context that allows us to retrieve the message name to know if this is a create or an update.
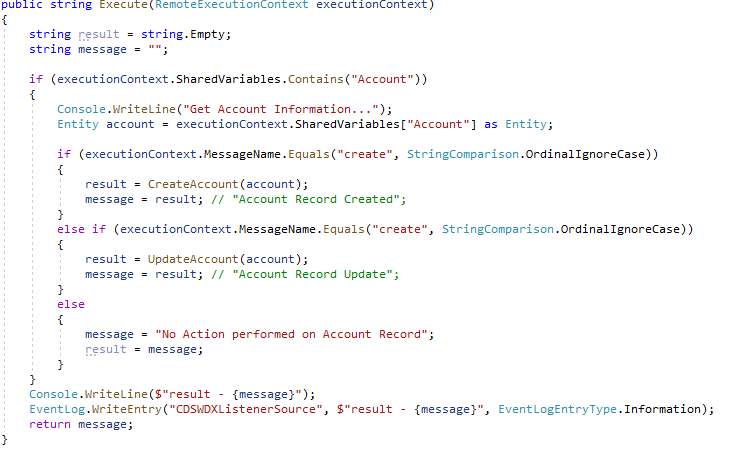
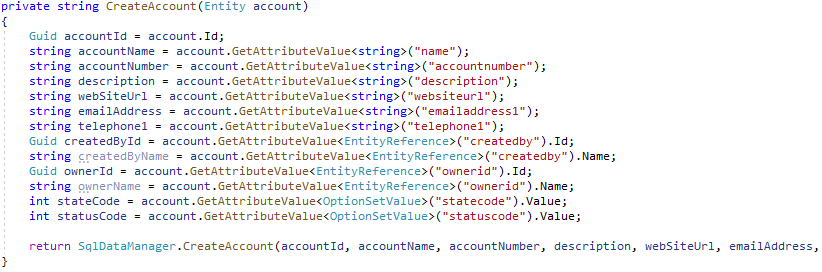
The CreateAccount and UpdateAccount functions receive the Account entity, take the necessary attributes and call the CreateAccount function of the SqlDataManager class in order to store the data in SQL Server.
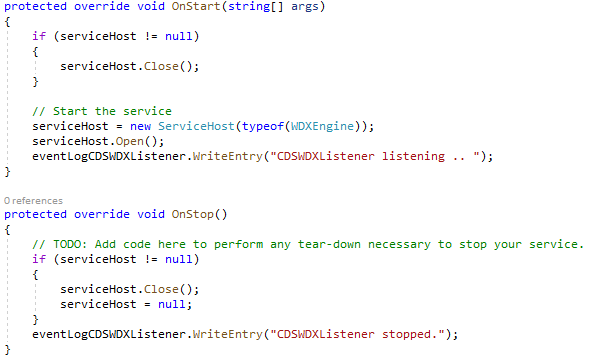
We added the Service class to the project, which contains an eventlog component that will write errors to the Event Log. The OnStart Event will listen to events and the OnStop Event will stop listening to the Azure Service Bus.
The Console application will run as a Windows Service. The solution includes the Project Installer class which allows us to install this as a Windows Service class. The Main entry point of the application provides us with some testing capabilities as well as installation or uninstallation of the Windows Service.
We added a Program class that allows us to install and uninstall the Windows Service from within our Visual Studio debugger.
Once the Windows Service is installed by running the VS application with the –install parameter, you will see the results in Services. Verify the Service is running, and depending whether you are testing this on your Local machine or on a Server, determine if to use the Local System account or the Network Service account.

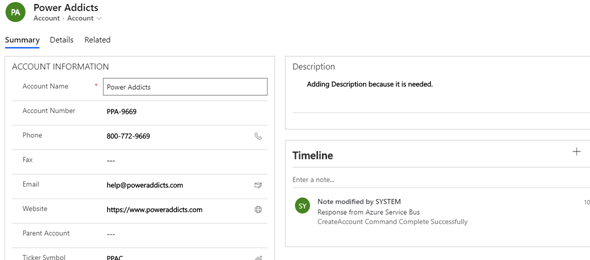
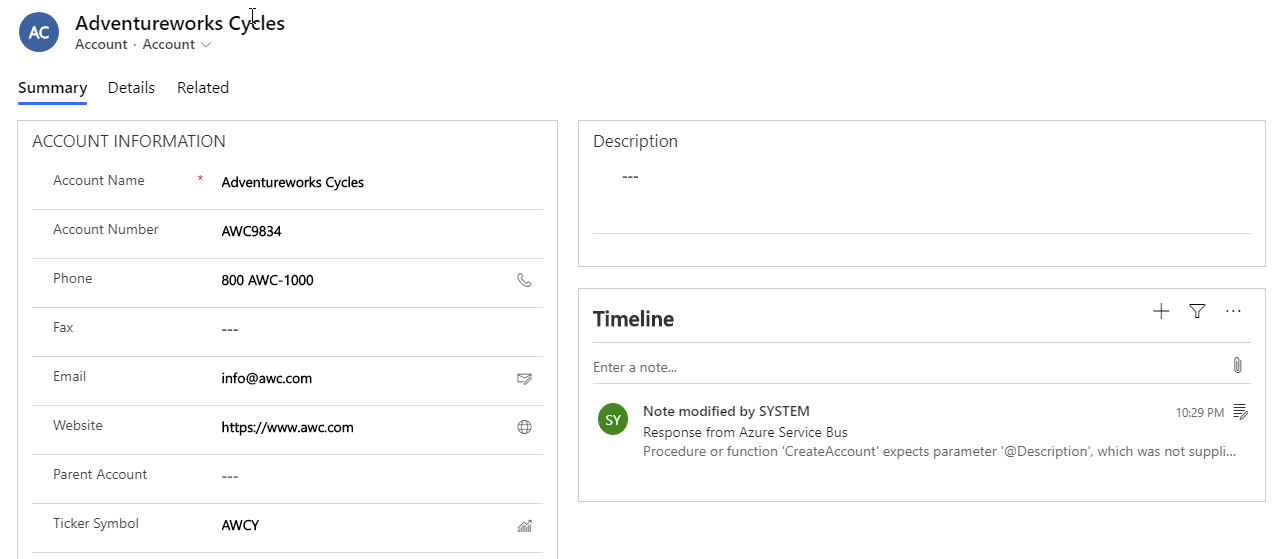
Now that we have done installing all the components, it is time to test all the parts working together. We tried running the first test, and the test did not have all the required fields. The description field was missing, so the result was a new note added to the timeline returning the error of a missing field from SQL Server.
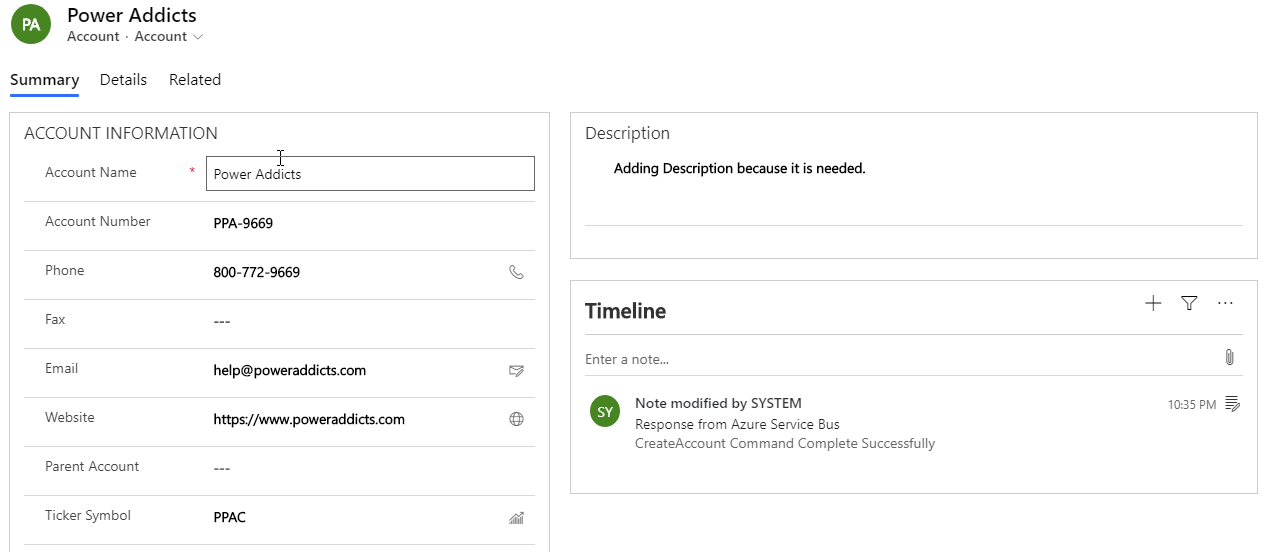
We then tried again, providing the Description field as well. This time we saw the success message in the timeline.
We wanted to verify that the data existed in SQL Server, so we ran a SQL Statement to validate the data, and received the following results:

Hope this will be a benefit for you. All the Plugin Source, Database Source and Listener Console Application Source Code is available on Github.
https://github.com/ariclevin/Integration/tree/master/ASBListener