
This article will describe the steps on how to create announcements in CRM and publish them on your SharePoint 2010 web application.
Step 1 – Create the announcements in CRM
Creating announcement in CRM is an easy enough process. If you have permissions to create announcements, all you need to do is go to your Administration area under, and choose the announcements link.
This will display the announcements entity, and will provide you with the ability to create new announcements, edit existing announcements or delete announcements that you no longer need.
Each announcement has an expiration date field as well as a more information url link field. The entity is not customizable, so additional fields cannot be added to the entity.
This article will describe the steps on how to create announcements in CRM and publish them on your SharePoint 2010 web application.
Step 1 – Create the announcements in CRM
Creating announcement in CRM is an easy enough process. If you have permissions to create announcements, all you need to do is go to your Administration area under, and choose the announcements link.
This will display the announcements entity, and will provide you with the ability to create new announcements, edit existing announcements or delete announcements that you no longer need.

Each announcement has an expiration date field as well as a more information url link field. The entity is not customizable, so additional fields cannot be added to the entity.
Step 2 – Create a WCF service to retrieve those announcements
If you have never created a WCF Service, you should review the channel 9 video: Creating Your First WCF Service. This video will give you the basics of create a simple WCF service. You can review some of the additional videos on instructions of deployment of the WCF Service. The video series were created for Visual Studio 2008, but can still be applied whether you are using Visual Studio 2010 or Visual Studio 2012.
If you do not require an additional layer of security, can connect to the CRM services from within SharePoint or have other means of retrieving data from your CRM environment, this section can be omitted.
In order for the WCF service to connect, we will need to create 3 methods: Connect To CRM, Retrieve Announcements and Disconnect From CRM.
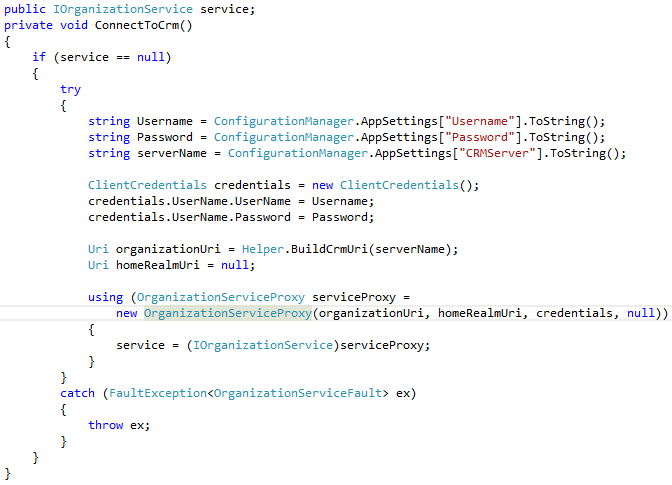
The Connect To Crm method retrieves the credentials and server information from an application configuration file, and creates the connection as shown in the figure below:
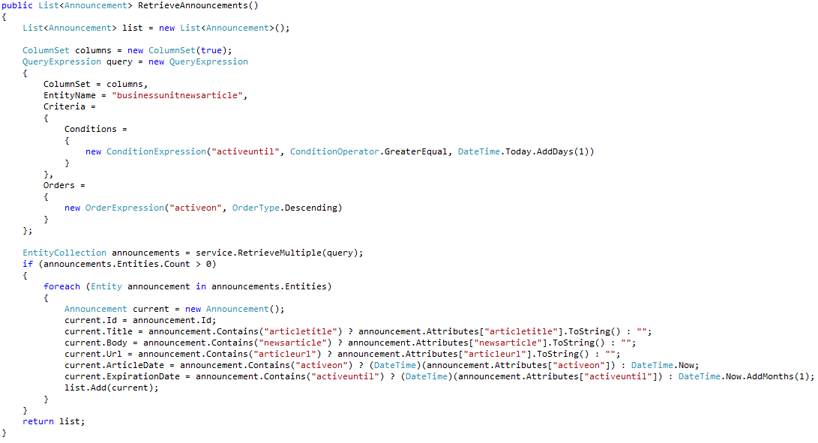
The Retrieve Announcements method retrieves all the announcements from CRM that have not yet expired and orders them by the most recent created (activated) date. The name of the announcements entity is businessunitnewsarticle, when accessing from within the SDK, but not available for customization from within the CRM environment.
The method returns a List of type Announcement, which is a Data Contract class containing the fields from the Announcement entity, as shown in the figure below:
    [DataContract]
    public class Announcement
    {
        [DataMember]
        public Guid Id { get; set; }

        [DataMember]
        public string Title { get; set; }

        [DataMember]
        public string Body { get; set; }

        [DataMember]
        public string Url { get; set; }

        [DataMember]
        public DateTime ArticleDate { get; set; }

        [DataMember]
        public DateTime ExpirationDate { get; set; }
    }
The Disconnect From CRM method sets the service public field to null to close the connection to CRM.
The class also contains a constructor and destructor which call the ConnectToCrm and DisconnectFromCrm methods.
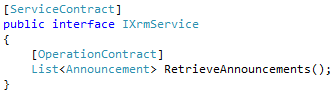
The WCF project will also contain the interface from which the class will inherit from:
Once the project has been built, debugged and testing, we can deploy the WCF method to a service host web site, and make it available online.
For more information on how to Host a WCF Service in IIS, you can view the channel 9 video here.
Step 3 – Create a SharePoint web part that will display the announcements
To create the SharePoint web part, we need to open Visual Studio 2010 or Visual Studio 2012 in our SharePoint environment.
We start by creating a new SharePoint 2010 Visual web part project.
Once the project has been created we will add a reference to the WCF Service that we created by clicking on the project menu and choosing Add Service Reference.
In the Add Service Reference window, we will need to specify the Url where the WCF service is deployed, and provide the name of the namespace for the WCF Service.
When the web service is added to the project, we can start calling the method of the service in our code as follows:
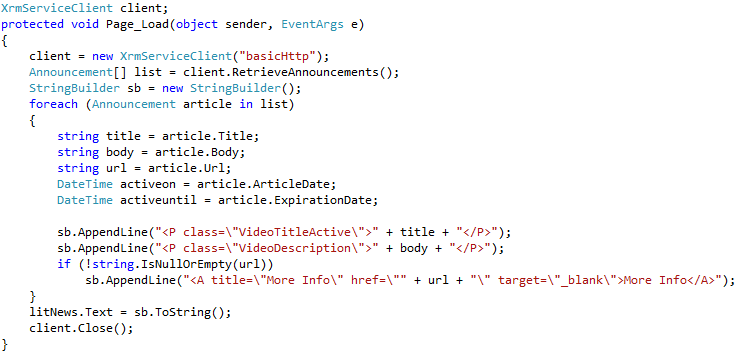
The code above connects to the WCF Service, calls the retrieve Announcements WCF method, loops through the results and finally displays the results in a literal control.
Step 4 – Publish and Deploy the SharePoint web part
After the Web Part has been tested in the development environment, package the solution, which will create a WSP file that can be deployed on the Production web server.
You can follow the instructions for deploying a web part in you SharePoint production environment, by viewing our previously created blog article here.
Note that the configuration file for the SharePoint web part is not deployed with the WSP file, so the web.config file of the SharePoint web site will have to be modified directly.
Navigate to your SharePoint web site, usually located in the inetpubwwwrootwssVirtualDirectories<portNo> directory.
Open the web.config file in a text editor or Visual Studio. It is a good idea to make a backup copy of the web.config before making any changes to it.
At the close of the system.webServer section, add a section called system.serviceModel and copy the content of your web part app.config system.serviceModel section there.
Your SharePoint web application should now be able to use the new web part that will retrieve announcements.