
The purpose of the original post (Part I), was to demonstrate how to add a button to a read only entity record, in order to create a new child record. This is a complex scenario that requires a lot of customization to the Ribbon/Command Bar. A much easier solution exists, if all you are looking for is to add the capability of adding child records to a read only record, as we discussed in the first part of this article.
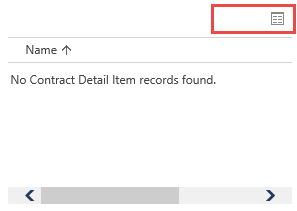
The first thing that we need is to open the child entity using Ribbon Workbench as shown in the previous solution. The previous solution had the Contract Detail entity, however in this solution we will need to Contract Detail Child entity, since we are making modifications to the subgrid and not the form. When looking at the form that is in Read-Only state, the add sign of the Contract Detail Child entity does not exist. We only see the table sign (associated grid) next to it, as shown in the image below.
In order to add the button, we will first have to create (or modify) a solution that will contain this entity, so that we can modify the properties in Ribbon Workbench. The screenshot below shows the solution that we created, containing only the custom entity that will contain a subgrid inside of the Contact Detail form.

We can now open Ribbon Workbench, by clicking on the Ribbon Workbench 2016 button in our Solutions view. When opening we will select the solution that we just created or modified, and this will display the Contract Detail Line custom entity that we created. As in the previous post, there are three command bars visible. In this scenario we will modify the Subgrid command bar.
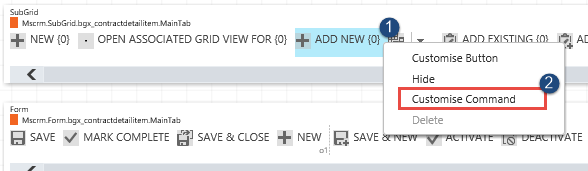
We are not going to add any additional buttons to this subgrid, but customize the Add New Command of the subgrid. When you right click on the Add New (1) command, it will open a drop down of options. From here we want to select the Customize Command (2) option, in order to make changes to the command that controls the visibility (and enable status) of the command and button. The screenshot below shows this.
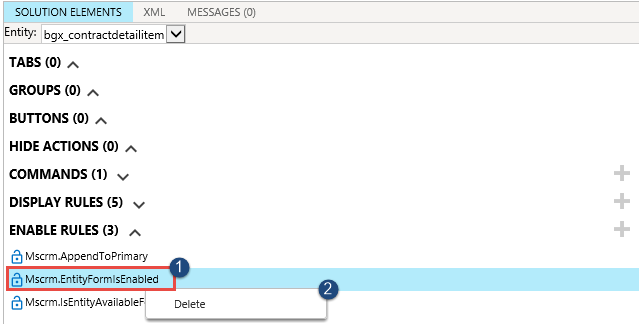
Once we click on the Customize command, the center area of the solution will display the Command, Display Rules and Enable Rules of the command that we selected, and allow us to make modifications to them. The rule that we are looking to make changes to is the Mscrm.EntityFormIsEnable EnableRule. Since we are not going to need the rule, because we always want to display the add sign regardless of the State of the Form, we can just delete it. We delete it by right clicking on the Mscrm.EntityFormIsEnable Enable Rule (1), and choosing/clicking the Delete option (2).
If you need to customize this further, and only enable the Add New command in certain conditions (such as when form is only existing or read only), you can add Display or Enable rules here to control this here. We demonstrated how to create those rules in the previous post.
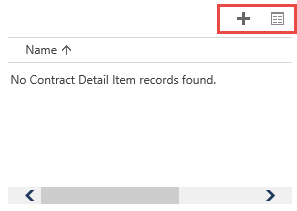
Once the Enable Rule has been deleted, we are now ready to Publish the Customizations. On the top Navigation area in Ribbon Workbench, click on the Publish button. This will publish the changes to the entity. The screenshot below shows us the condition of the subgrid after the customization changes have been completed.
That is basically it. I would like to thank Alex Shlega for helping with this solution.