
It seems like this was only a few days ago, but based on the sample that was published by Microsoft it’s been almost 2 weeks since Microsoft released CRUD support on Virtual tables.
To tell you the truth, I have not really worked with Virtual Entities, ever since it was released, and I would have a lot of reasons to actually use them, it just never seemed the right time. In the recent release, I actually did my own little PoC to determine the complexity, and if it was always that simple, probably something to regret.
Let’s jump into it. Virtual tables (or Virtual entities) have been available for quite some time now, but only for read access. Now with the addition for Create, Update and Delete, this gives us for access to integrating between our Dataverse environment and a publicly available SQL Server (or other platform). In today’s post we will show how to go through the process of creating the SQL Server table, creating the plugin, data provider, data source and finally the virtual table an connecting all the pieces together.
All of the source code in this post is shown in images, but will be available via the Github Link at the bottom of the post.
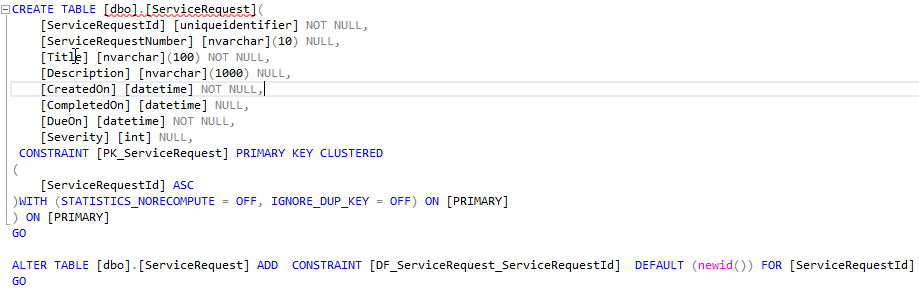
Let’s start with the database. In this case I used an Azure SQL database, and created a table called Service Request. The script for creating the table is shown below.
Next we create a Plugin Project in Visual Studio. You will need to install the following packages in your project in order to get access to all of the required resources (per Microsoft documentation):
- Microsoft.CrmSdk.CoreAssemblies
- Microsoft.CrmSdk.Data
- Microsoft.CrmSdk.Deployment
- Microsoft.CrmSdk.Workflow
- Microsoft.CrmSdk.XrmTooling.CoreAssembly
- Microsoft.IdentityModel.Clients.ActiveDirectory
- Microsoft.Rest.ClientRuntime
- Newtonsoft.Json
Within the plugin we will create 6 Classes. The first is a static class containing the Connection code, and the other classes are each for a message (Create, Retrieve, RetrieveMultiple, Update, Delete). You can create them as a single file or in multiple files. For the demonstration they are all created in separate files.
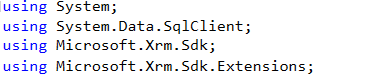
The following using statements have been added to all files, although not all is required for all classes.
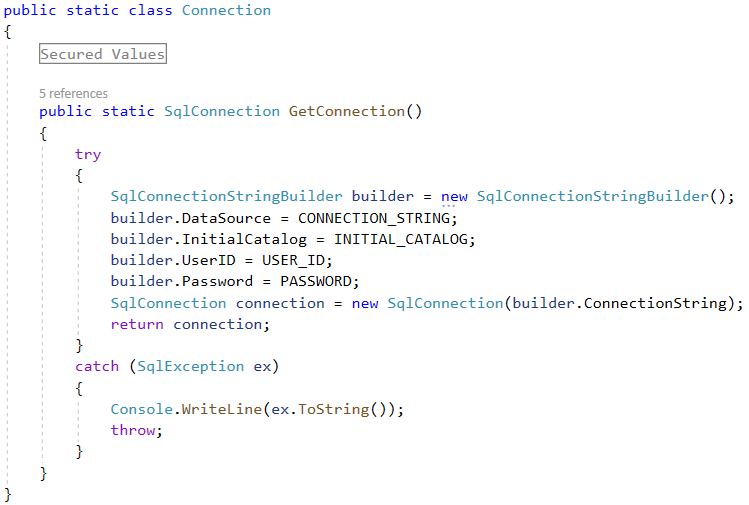
Let’s start with the Connection class. We use the SqlConnectionStringBuilder class to generate the Connection string and return it to the rest of the classes that will consume it. This is shown in the image below.
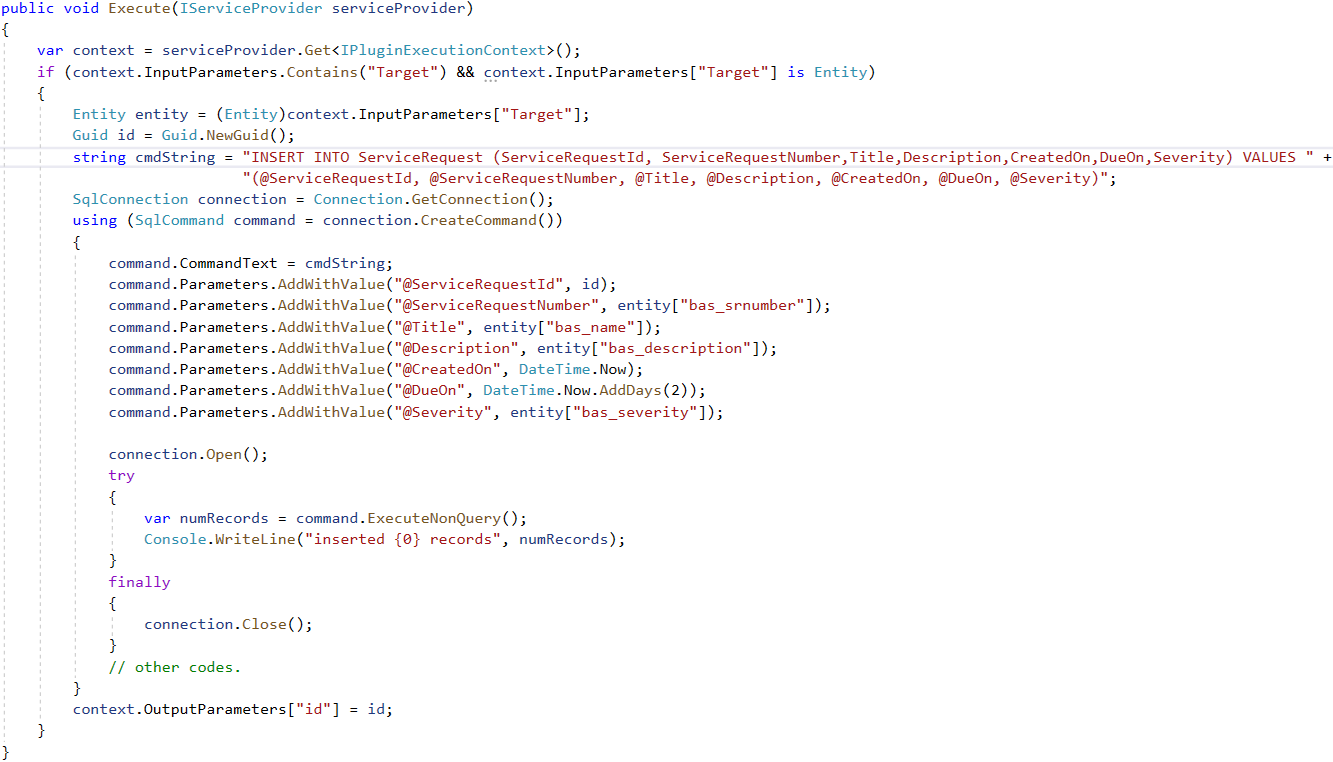
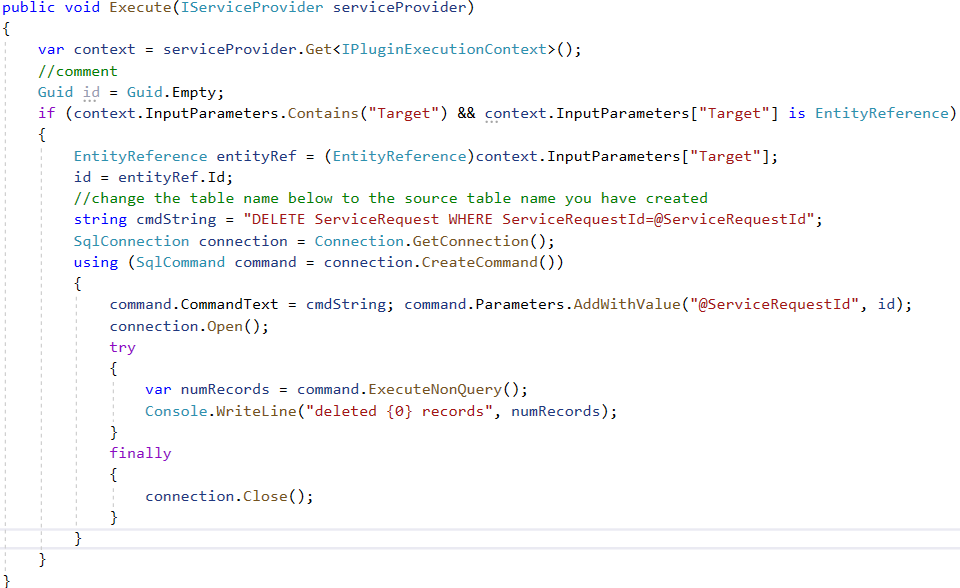
Next, let’s look at the CRUD classes. All of the classes implement the IPlugin interface and call the Execute function of that Interface. In each of the class based on the required functionality we retrieve the Execution Context in order to read data from the Dataverse environment, and then synchronize between our Dataverse environment and our Azure SQL Server. The screenshots below show the code for each of these.
Create Class:
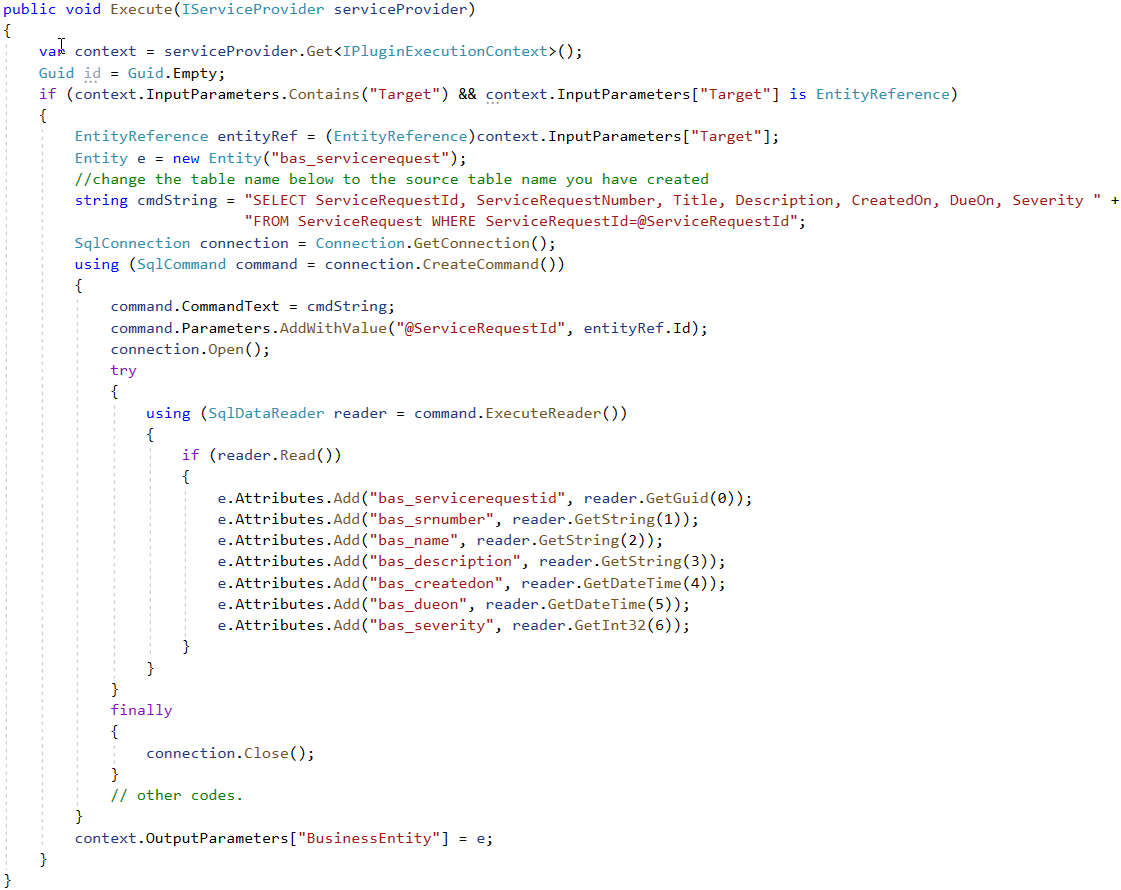
Retrieve Class:
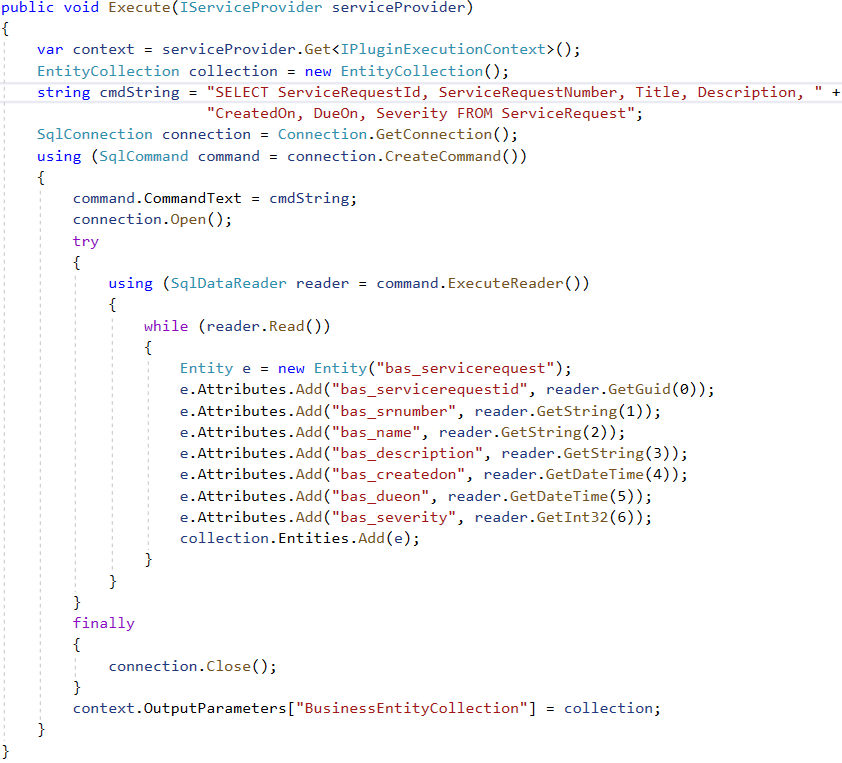
Retrieve Multiple Class:
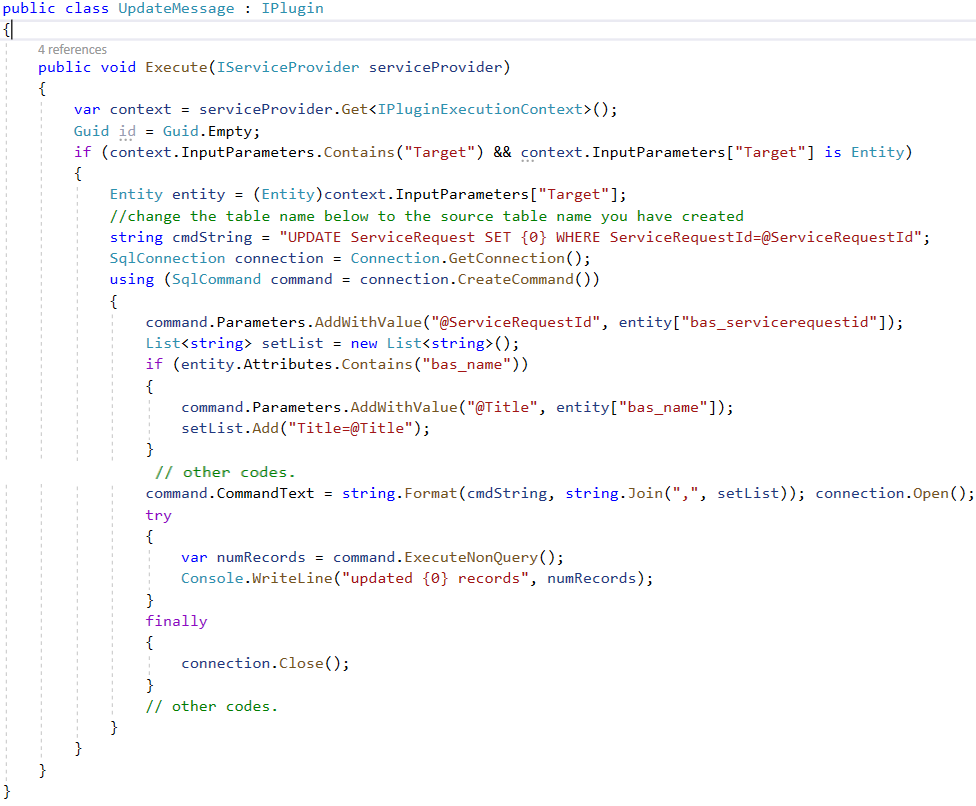
Update Class:
Delete Class:
Once the code for the Plugin is completed we will go ahead and register the plugin via the Plugin Registration Tool. Before registering the plugin, make sure that you have the latest version of the Plugin Registration Tool that provides support for CRUD operations in virtual tables. At the time of writing this post, the required version was 9.1.0.24. You can find the download link below:
https://www.nuget.org/packages/Microsoft.CrmSdk.XrmTooling.PluginRegistrationTool
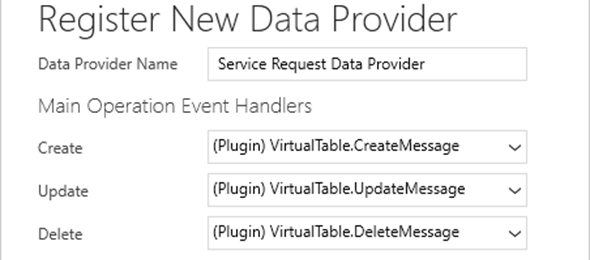
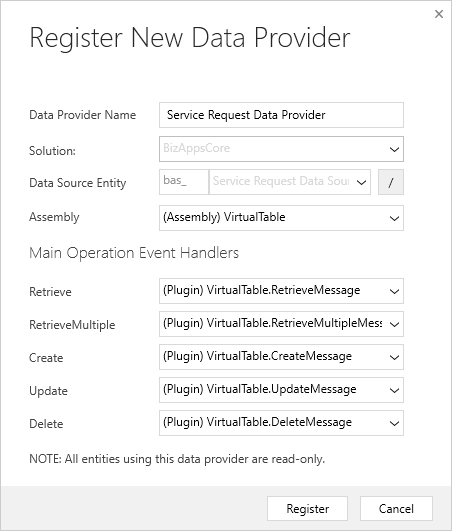
Now let’s go ahead and register the Plugin. This should include all of the five messages above. Once the Plugin is registered, we go ahead and Register a new Data Provider (using the Plugin Registration Tool).
Click on the Register button, and select Register New Data Provider (Ctrl + P).
When selecting the Data Source Entity for the first time, choose the Create New from the drop down. It is important to select the solution that contains the publisher that has the prefix that you want to use, or you will have to modify you code for something else.
Once we are done with creating the data provider in the Plugin Registration Tool, we can go ahead and start setting up the Virtual Table in our Dataverse environment. This functionality is not available yet in the Maker Portal, so we will have to do this in the Classic interface (Advanced Settings).
Navigate to Settings and Administration, and select the Virtual Entity Data Sources, and click on the New button. A popup will appear with a drop down to select a Data Provider as shown in the image below.
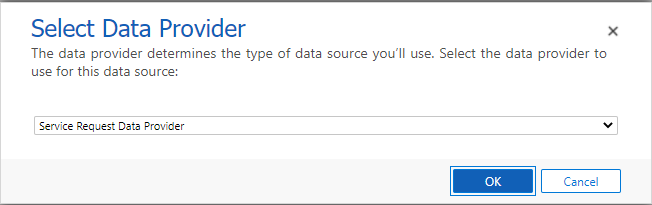
Select the name of the Data Provider that you selected, and click on the OK button. Then you will be able to provide a name for the Data Source.
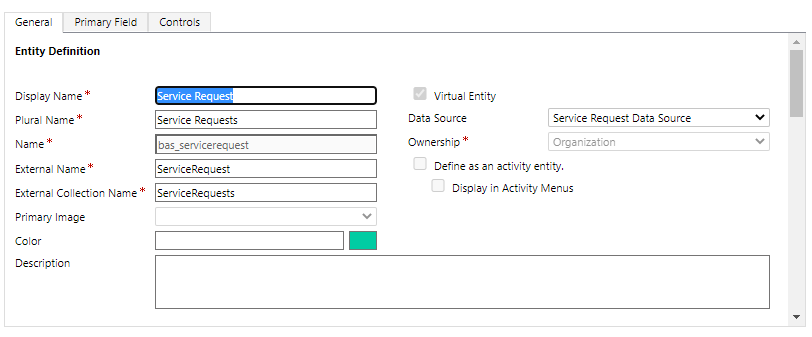
Click on Settings again and select Solutions. Select the name of the solution where you want to create the fields for this table. Check the Virtual Entity option, and select the Data Source that you just created. Enter a Display Name, Plural Name and Name for the entity. You will notice that there are two additional Names which are the External Name and the External Collection Name. For the External Name, you should enter the name of the Source table. The External Collections name can contain the same values as the Plural table name.
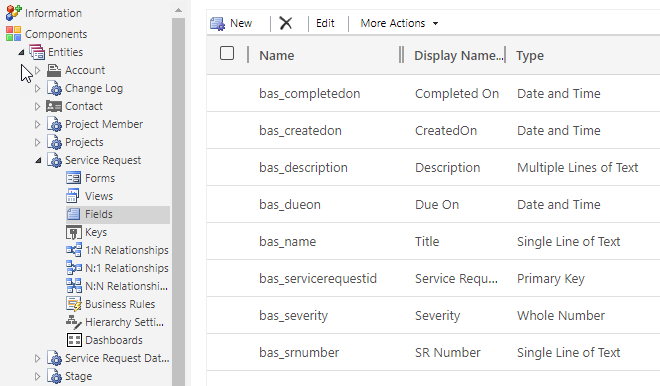
Once you have finished creating the table, go ahead and create all of the columns that you are going to use to view or update within the Virtual Entity. Only add columns that you want to either read from your Azure SQL table or that you want to write back. Any columns that are for management only are not really required. The image below show the columns that were created for our test:
Next, we need to add this entity to our Model Driven App, so that we can test this out. Select an existing MDA or create a new one and add the entity to it.
Finally go ahead and test the results.
The animated screenshot above shows adding, reading and updating entity fields using CRUD operations.
You can click on the link below to get access to the Source Code:
https://github.com/ariclevin/VirtualTables