
Recently, while working on some requirements, I noticed that one of the solutions that the company implemented was to replicate the Azure Groups and Members from AD into their Dataverse environment. This seemed to me to be unnecessary, but sometimes due to security restrictions, this might be the only way.
After further investigation, the only requirement from the business was to check whether particular users belonged to groups, and there was no immediate requirement of having the AD Members stored in our Dataverse environment, especially due to the fact that we would have to continuously sync between AD and Dataverse.
I offered the business an alternative. What if you had an application where you could specify the name of the group and it would show you all of the users that belong to it, or even better, specify the user and it will let you know all the group the user belongs to. This seemed to be like a no-brainer, and from our point of view an easy solution especially since we finally got access to use the Graph API (for Users and Groups only).
There are other alternatives to this of course, but this was going to work for us, especially since individual users did not have access to Graph API, but we had an App Registration with Client Id and Secret.
The following section briefly explains how to set up permissions to Azure Graph Api. Login to Azure and click on App Registrations. You will need to set up the API permissions and the Client Certificate, and finally copy the information so that you can use it within your flow.
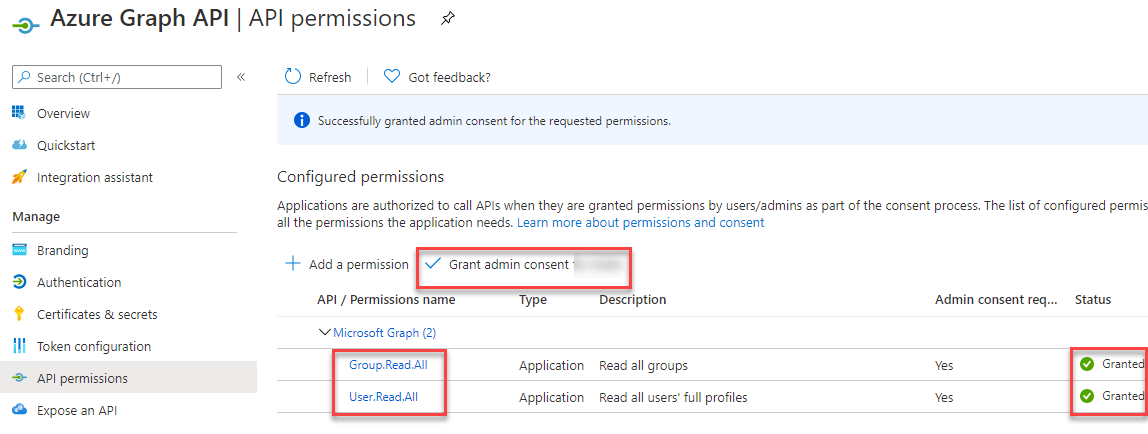
Once you get into the New App Registration and given it a name, click on the Api Permissions, and select Microsoft Graph, and choose the Application type (and not delegated). You will need to add two sets pf permissions: Group.Read.All and User.Read.All, and then make sure that you grant consent, as these permissions require admin consent.
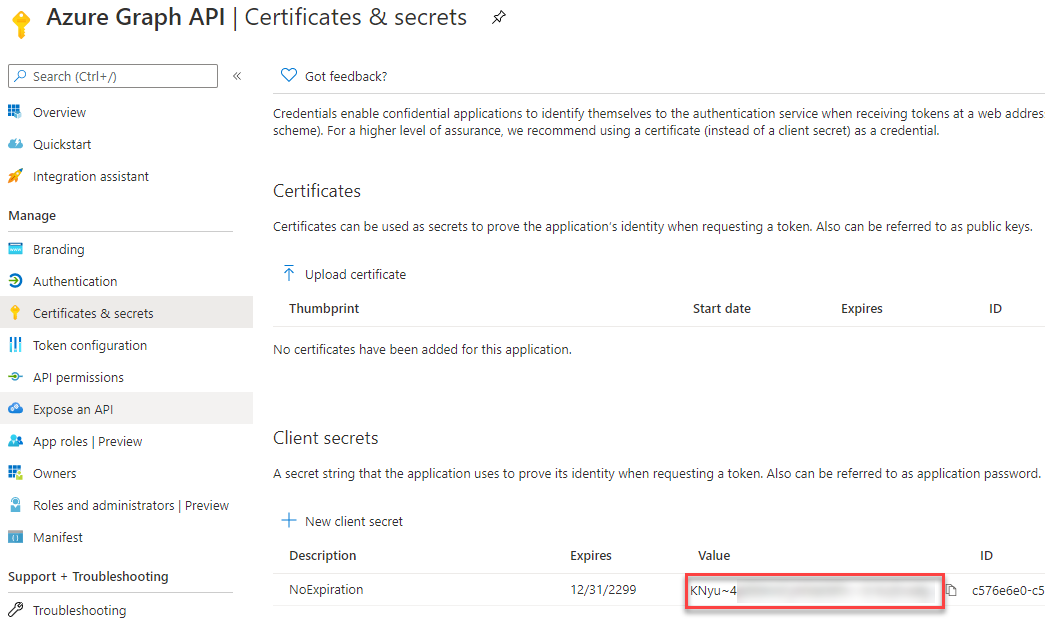
Next, set up the Client Secret. Click on the Certificates & secrets, select the option to add a new Client Secret. You can set the Client secret to expire in 1 year, 2 years or to never expire. After you have created the Client Secret, copy it into notepad or another program. You will need this for later. Once you leave the App Registration, you will not be able to retrieve the Client Secret, so make sure that you store it for later use.
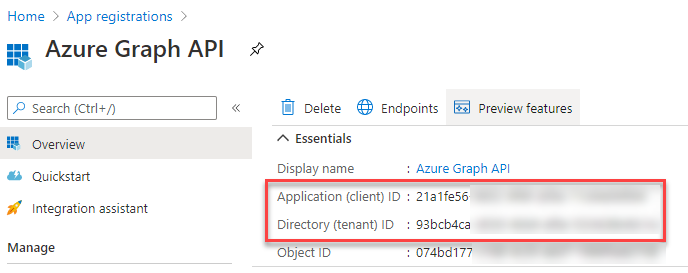
Now that you are done, go back to the Overview page of your app registration. You will need to copy the Application (client) ID and the Directory (tenant) ID, the same way you copied the Client Secret before. The following image shows the information on the Overview page.
Since I don’t really like designing stuff, and prefer to take predesigned templates, I took that Org Browser Canvas App template that is available from the Create App page.
The app contains more features then what I was looking for, so I removed it to a minimal so that it just contains the home screen and search screen .
At the end, I had two screens. Let’s quickly go over these. I named the app AD Search. My home screen contains the title and logo, and two buttons: User Search and Group Search, which both redirect to the Search Screen after Setting the parameter action type either Users or Groups.
The View my profile at the bottom is still in progress. I have not yet decided what to include there.

When the Search Screen loads, it clears any previous search results from the results collection, so it is always a new search by calling the Clear on the ADSearchResults collection.
The form displays a search control, and when the search text is entered, and the search icon is clicked, it calls Power Automate flows to retrieve the user matching the email address or the groups matching the display name of the group.
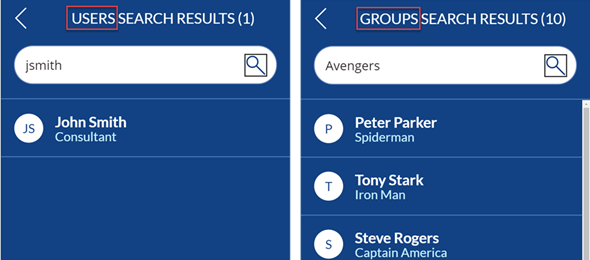
The following screenshots shows both scenarios.
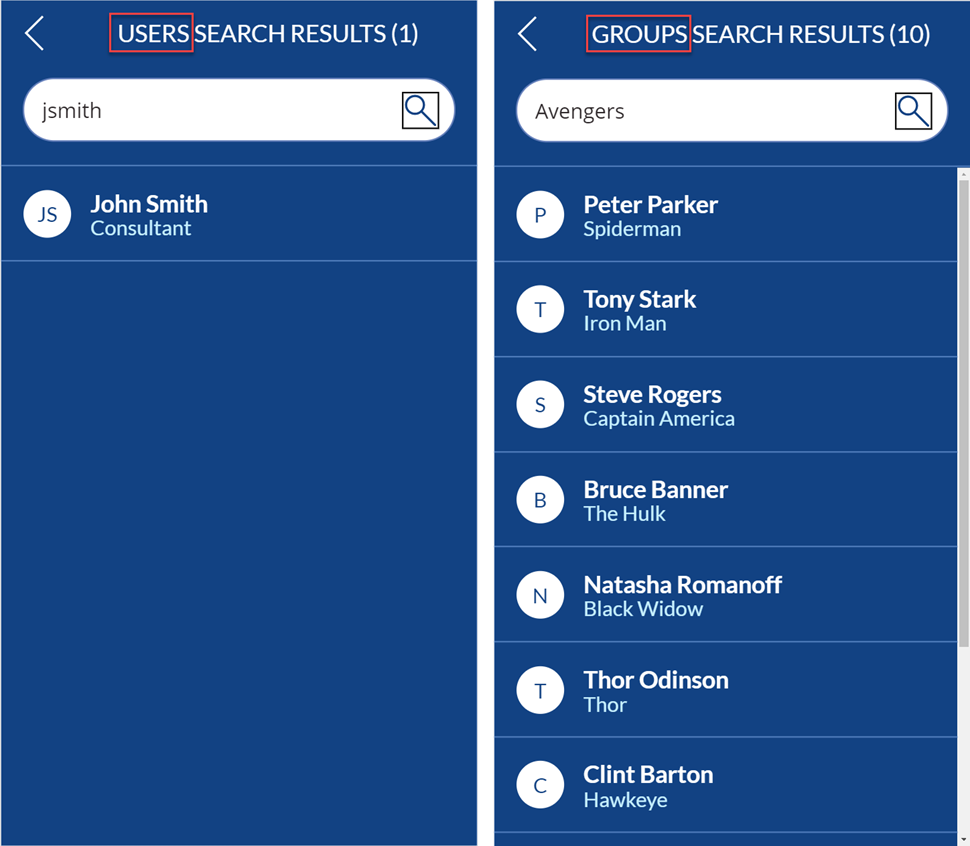
If we look at the source for the search icon OnSelect function, it will show us that we are adding the results from the GraphUserSearch flow or GraphGroupSearch flow into a new collection called ADUserResults.
If (actionType = "Users",
ClearCollect(ADUserResults, GraphUserSearch.Run(txtInputSearchUser.Text, actionType)),
ClearCollect(ADUserResults, GraphGroupSearch.Run(txtInputSearchUser.Text, actionType)))
The Gallery Items points to ADUserResults, and then we show the Initial, DisplayName and Title of each person in the results of each gallery item.
Now, let’s look at the logic for Power Automate, but before in case anyone is not aware, I would like to introduce Graph Explorer which can help out with configure Graph Api requests. The Graph Explorer can be accessed via: https://developer.microsoft.com/en-us/graph/graph-explorer.
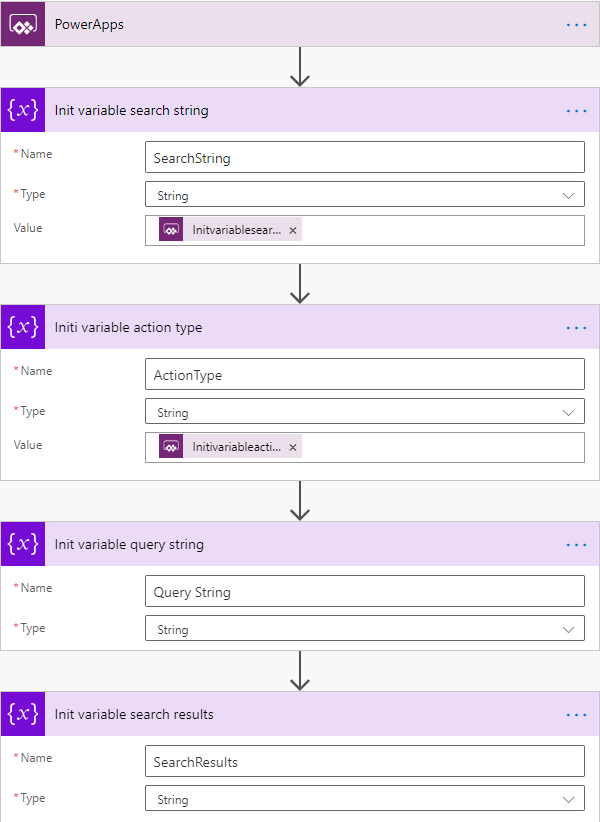
Both flows start the same way, and we can combine both of them into a single flow, but I split them for simplifying this article. Our trigger for this flow is Power Apps, and then we initialize for variables of type string. These variables are the Search String (containing the value of the search string from the Canvas App), the Action Type (containing the action from the Canvas App, which can be Users, Employees, Groups or the type of search that we will be performing), the Query String and the Search Results (containing the placeholder for the results). The image below illustrates this.
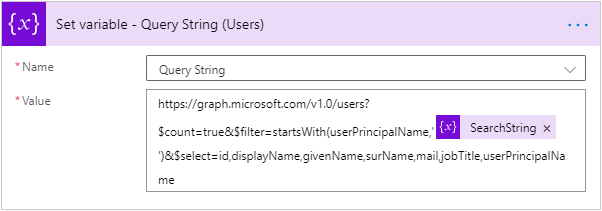
The next part is we set the variable Query String. This will contain the Graph Api query string that will be called, as shown in the image below.
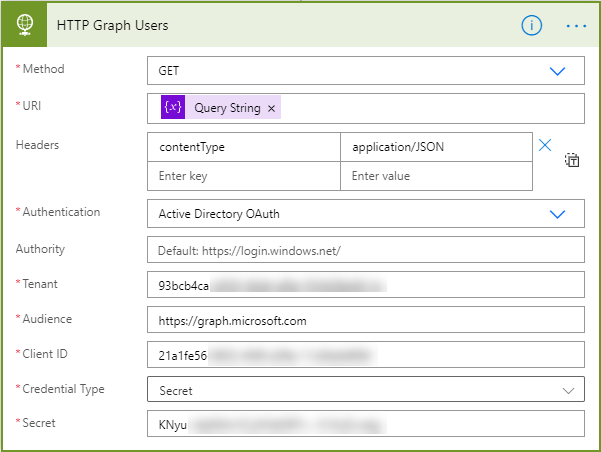
We can take that same query string and test it out in Graph Explorer to make sure that it works before adding it to the flow. Next, we need to call the Api, using a GET request and passing the Query string that we specified in the URI parameter. We add a contentType header with a value of application/JSON, as our results will be in JSON format.
We need to provide the authentication method to retrieve the results. As we created an App Registration using a Client Secret, we will use Active Directory OAuth. This is where we will need to information that I previously mentioned you should write down.
We will provide the Directory (Tenant) Id, the Audience, the Application (Client) Id and the Client Secret. The image below illustrates the HTTP request.
Finally, we need to store the results in the variable we instantiated earlier (called Search Results), and then pass the Response back to the Canvas App using the Response action (of the Request Connector).
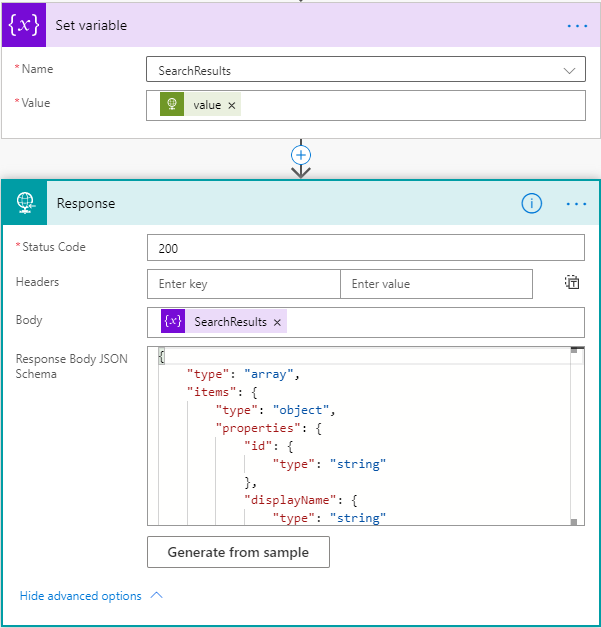
The value that is entered in the SearchResults variable is the value of the body of the previous step or:
body(‘HTTP_Graph_Users’)?[‘value’]
We enter that value in the Body of the response. We also need to specify the Response Body JSON Schema, which will contain the elements that will be returned to the Canvas App. The sample below shows this text.
{
    "type": "array",
    "items": {
        "type": "object",
        "properties": {
            "id": {
                "type": "string"
            },
            "displayName": {
                "type": "string"
            },
            "givenName": {
                "type": "string"
            },
            "surname": {
                "type": "string"
            },
            "mail": {
                "type": "string"
            },
            "jobTitle": {
                "type": "string"
            },
            "userPrincipalName": {
                "type": "string"
            }
        },
        "required": [
            "id",
            "displayName",
            "givenName",
            "surname",
            "mail",
            "jobTitle",
            "userPrincipalName"
        ]
    }
}
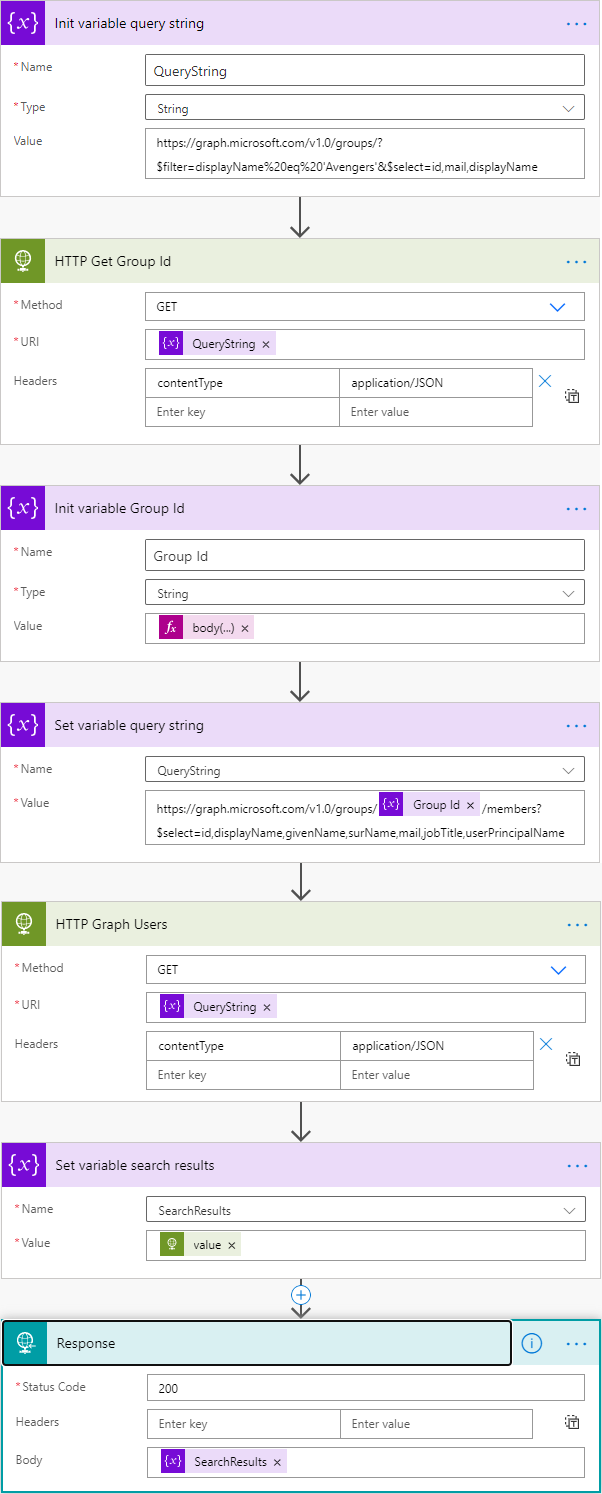
When we want to use the same logic for Querying the Groups, the flow is similar but there are a few options that are changed. After the initialization of the variables, we need to first query the Graph Api to get the Id of the group that we are querying, and only then can we get the members of the group. This flow contains two calls to the Api. The image below illustrates the calls to the Api.
The solution files has been posted to my github repository:
ariclevin/MSGraph (github.com)
A You Tube video is available as well:
https://youtu.be/DqqpDmdaVxc
Special shoutout to Elaiza Benitez for her episode on Microsoft Graph API authentication on What the Flow:
How to authenticate as an application with Microsoft Graph API (youtu.be)